How to Create a Photo Report

Creating a photo report is the process of preparing a document with photos to document object conditions, completed work, or inspection results. The online service lets you quickly gather images, structure them, and generate a ready report. A photo report can be created for various tasks: construction, inspections, insurance claims, and client reporting. The system simplifies the work and eliminates the need for manual document formatting.

How to Create a Photo Report

Key Steps to Create a Photo Report

The process of creating a photo report includes several steps:

  • create a new document
  • add photos
  • organize images
  • add comments
  • generate the final file
Following this sequence yields a logical and well-structured result.

Try the service

If you're not logged in and just want to test the steps from the guide:
If you want to create full-featured photo reports in the dashboard — top up your balance in your user profile.

Step-by-Step Guide: How to Create a Photo Report Online

Step-by-Step Guide: How to Create a Photo Report Online

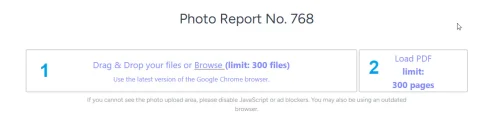
1. Create a new photo report

To create a photo report online, start by creating a new document. In the system, this takes just a few seconds. 
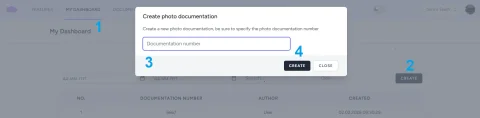
After logging in, follow these steps:
  1. Go to My Reports
  2. Click the Create button to start a new report
  3. In the pop-up window, enter a document number from your own tracking system or any custom number
  4. Confirm the creation of the new photo report
This sets up the foundation for structured work with inspections, progress monitoring, or site condition records.

2. Upload photos

2. Upload photos
The next step is adding images. You can upload photos:
  • from your computer
  • from your mobile device
  • directly while shooting using the INSPECTOR mobile app
Uploading photos is a critical part of photo documentation, because the images form the core content of the report. It is recommended to:
  • upload photos in a logical order
  • use clear angles
  • avoid duplicates
Supported file formats:
  • Image files: jpeg, jpg, png, webp
  • PDF files – they are split into pages and uploaded sequentially

3. Sort and organize images

3. Sort and organize images
After uploading, it's important to organize the photos. This is what distinguishes a professional photo report from a random collection of images. What you can do:
  • reorder photos
  • group them by phases or zones
  • create "before / after" logic
  • arrange them in the sequence of work performed
A well-structured report improves readability and makes analysis easier. Learn more about how the photo sorting feature works in the dedicated documentation section.

4. Add comments and captions

Each photo can be supplemented with text. This is especially important for:
  • inspections
  • construction reports
  • insurance documentation
Comments help to:
  • explain what is shown
  • record defects or changes
  • provide context for clients or colleagues
The result is a complete report with images and explanations, not just a photo gallery. Details about the image annotation feature are available in the documentation.

5. Configure the report layout

5. Configure the report layout
Before generating the document, you can choose how the final file will look. Available settings:
  • number of photos per page
  • image placement
  • caption display
  • document format
The report layout settings functionality is described in more detail in the documentation. Using different layouts allows you to tailor inspection results for:
  • internal reporting
  • client presentations
  • official documents

6. Generate and download the report

6. Generate and download the report
The final step is generating the document. You can download it to your computer or send it to your email. After creating the photo report, you get:
  • a ready-to-use structured file
  • a document you can send to clients
  • a report suitable for archiving
The entire process—from uploading photos to the finished report—takes minimal time. Additionally, when using the mobile inspection app, you can email yourself an archive of photos stored in the service, along with image details and capture context.

Advantages of Creating a Photo Report Online

Creating photo reports with an online service offers several advantages over manual formatting:

  • time savings (no need to compile documents manually)
  • automatic report structure
  • easy handling of large numbers of photos
  • consistent format across your team
  • ability to work from a mobile device
The online tool is especially useful for regular photo documentation and field work.

Where Photo Reports Are Most Commonly Used

Photo reports are used across various industries where visual information needs to be documented:

Construction and renovation

  • tracking work stages
  • contractor oversight
  • reporting to clients

Inspections and audits

  • technical checks
  • condition monitoring
  • inspection reports

Insurance

  • damage documentation
  • claim processing
  • property condition verification

Work completion reports

  • project handover
  • client reporting
  • result documentation

Common Mistakes When Creating a Photo Report

When creating photo reports, users often make these mistakes:

  • lack of structure
  • too many unnecessary photos
  • missing captions
  • incorrect image order
  • inconsistent report format
Using a specialized service helps avoid these issues and standardizes the process.

How to Speed Up Photo Report Creation

To create a photo report faster and more conveniently:

  • use the mobile app to capture directly into the system
  • add captions right when uploading
  • apply a consistent layout template
  • sort photos as you add them
This reduces preparation time and improves report quality.

Online vs. Manual Photo Report – What's the Difference?

Aspect Online Service Manual
Speed high low
Structure automatic manual
Errors minimal frequent
Scalability easy difficult
Team collaboration convenient limited
Using an online tool makes the process of creating photo reports more predictable and scalable.

Functions Used

This guide uses the following functions:

Where It Is Used

This guide can be applied, for example, in the following fields:

FAQ – Frequently Asked Questions

Yes, there is a free mode that does not require registration.
The report is generated as a ready-to-use document suitable for sending and archiving.
Yes, the INSPECTOR mobile app is available for field work.
Yes, the system is designed for B2B tasks such as construction, inspections, and reporting.