Before and After Photo Report

Before and after photo reports offer a clear visual comparison of changes. Showcase renovation results and project transformations effectively.

Before and After Photo Report

What is a photo report in the "before and after" format

A before and after photo report is a document in which photos are selected and arranged to show the change in the object's condition over time. It usually includes paired images: one captures the initial state, the other the result after work completion, defect elimination, cleaning, repair, or other intervention. The main value of this format lies in its clarity. A regular text report can list actions and results, but it's the photos that allow quick understanding of the scale of changes. This is especially important when the report is reviewed not by the executor, but by the client, manager, engineer, inspector, or client representative. The "before and after" format is useful not only for presenting the result but also for internal control. It helps the team standardize reporting, simplifies work approval, and reduces the number of additional questions about execution quality.

Create a photo report for your use case

Use the service to prepare a photo report for a similar task and see how it works in practice.
Create a photo report without registration
If you want to create full-featured photo reports in the dashboard — top up your balance in your user profile.

When a before and after photo report is used

The "before and after" format is applied in scenarios where it's important to show a change in the object's condition, not just attach a set of photos. Below are the main cases where this approach is particularly effective.

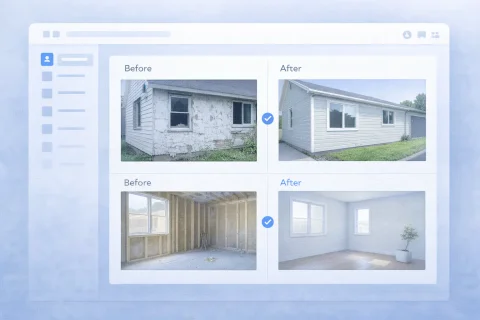
Demonstrating the result of completed work

This format is suitable for situations where the client or manager needs to see what exactly was done. Photos before the start of work show the initial problem, and photos after completion show the final result. This is especially useful in repairs, installation work, facility maintenance, cleaning, surface restoration, and defect elimination. Such a report visually confirms that the task has indeed been completed.

Comparing object conditions

Sometimes the main goal of the report is not work handover, but comparing the object's condition at different points in time. For example, before and after an inspection, before and after addressing comments, before and after an emergency situation, or before and after technical maintenance. In this case, the photo report helps not only to show changes but also to record dynamics. This makes the document useful for technical analysis and subsequent checks.

Reporting to the client

The before and after format is particularly well received by clients because it doesn't require lengthy study of the document. Even at a glance, it's clear what the problem was and what the result is after the work. Such a report increases transparency of interaction, strengthens trust, and reduces the likelihood of disputes over the quality or scope of work performed.

Internal quality control

Within a company, such photo reports can be used as a tool for monitoring employees, subcontractors, and service teams. They allow quick verification of how well a task was performed and, if necessary, comparison of the result against a unified standard. This is especially important in distributed teams where the manager is not always personally present on site.

Mobile field reporting

Present before-and-after photos in a clear photo report

INSPECTOR fits repair, service, cleaning, restoration, and any work where you need to visually show the initial state and the result.

  • Paired before-and-after shots
  • Captions for every image
  • Consistent order in the report
  • DOCX file ready to send to the client

Create a before-and-after report in the app

Capture the starting condition and the result, add your notes, and send the finished report.

Before & after reportsPhoto report appWork completion photo report

Where the "before and after" format is especially in demand

The "before and after" format is widely used in various industries, but it provides the greatest value where the result of work is easier to show visually than to describe in text.

Construction and repair

In construction and repair, such a photo report helps show the condition of the object at different stages: before work begins, after completing a phase, after eliminating defects, or upon task completion. This is convenient for phase handovers, contractor control, and preparing materials for the client.

Cleaning

In cleaning, the before and after format is especially powerful because the result is directly related to the visual change in the condition of the room, area, or equipment. Such reports are easy to perceive and well-suited for regular reporting.

Technical maintenance and service work

If a service team performs repair, maintenance, or adjustment of equipment, before and after photos help show exactly what was repaired, cleaned, replaced, or brought into working order. This is useful for both the client and internal documentation.

Landscaping and facility operations

When working on grounds, facades, engineering zones, and common areas, the before and after format helps document changes visually. This makes the report convenient for management companies, contractors, and operation services.

Why the "before and after" format works better than a regular set of photos

A regular photo report may contain good shots, but without a clear structure, the user has to match the images themselves and draw conclusions. The before and after format removes this problem because the comparison logic is already built into the document.

  • First, it makes the result obvious. The user doesn't need to figure out which photos belong to the initial state and which to the final state.
  • Second, this format speeds up perception. The document is read faster, and the meaning of the changes becomes clear immediately.
  • Third, it strengthens the evidential value of the report. When the change is visible on a pair of comparable images, it's harder to dispute the result.
Ultimately, the before and after photo report becomes not just a set of shots, but a tool for demonstrating the result.

What photos are needed for a before and after photo report

For the format to work really well, it's important not just to take pictures, but to prepare images that can be correctly compared with each other.

Photos of the initial state

"Before" photos should show the object before the start of work, inspection, cleaning, repair, or other action. They set the starting point and form the basis for comparison. It's important that the problem, defect, dirt, damage, or general condition of the area is clearly visible in these shots.

Photos of the final state

"After" photos should be comparable to the "before" images. Their task is to show what has changed and what the result is after the work is completed. The more precisely the angle, scale, and shooting area match, the stronger the comparison works.

Overall shots

Overall photos help understand the context: where the object is located, what the area looks like as a whole, and what the change relates to. They are especially useful if the report is viewed by someone who was not on site.

Detailed shots

Close-ups are needed when it's important to show a specific problem or result at the detail level: a crack, chip, dirt, damaged component, wear marks, quality of surface treatment, etc.

Additional confirming photos

Sometimes, for the completeness of the report, it's useful to add intermediate or explanatory images. They help better reveal the scope of work, the complexity of the situation, or the specifics of the result. Ultimately, a quality before and after photo report usually combines general context, paired comparable shots, and detailing as needed.

How to properly prepare a before and after photo report

For such a document to be truly understandable, it's important to structure it correctly. It's not enough to just place two photos side by side – you need to ensure the comparison is readable without extra explanations.

  • First, images should be combined into logical pairs. The user should immediately see which photo corresponds to the "before" state and which to the "after" state.
  • Second, it's useful to group photos by zones, rooms, phases, or objects. This is especially important if one report contains many comparisons.
  • Third, it's necessary to add captions. Even brief explanations help understand what exactly is shown in the shot, which area is documented, and what the change consists of.
  • Fourth, it's important to use a unified page format. If photos are in pairs in one place and chaotic in another, the perception of the report deteriorates.
  • Fifth, the order of blocks should be logical. With a large amount of material, correct sorting directly affects the readability of the document. This is especially important when working with a large number of photos and comparison scenarios.
A well-prepared before and after photo report allows a person to quickly see the result without wasting time matching the shots themselves.

Structure variants for a before and after photo report

The same format can be designed differently depending on the usage scenario. Below are the main structure variants suitable for different types of tasks.

Paired comparison

The most straightforward variant – when two shots are placed side by side or one after another: before and after. This approach works well if you need to show changes in a specific area or individual object.

Grouping by zones

If the object consists of several rooms, sections, or elements, you can first divide the report by zones and then show the "before and after" pairs within each zone. This approach makes the document more structured and helps avoid chaos with a large number of photos.

Sequence by phases

Sometimes it's important to show not only the initial and final states but also the course of changes. Then the report can be built as a sequence: before, during, after. This variant is useful in construction, repair, restoration, and service work.

Comparison with comments

In some cases, photos should be accompanied by text explanations: what exactly was done, which defect was eliminated, what result was achieved. This is especially useful in B2B reporting, where the document is read not only by the executor but also by the client or inspector. Ultimately, the structure should correspond not only to the aesthetics of the document but also to the task it solves.

Typical errors in before and after photo reports

The before and after format seems simple, but in practice, mistakes are often made that cause the report to lose clarity and evidentiary power.

Incomparable photos

If the shots are taken from different angles, at different distances, or with different composition, the comparison becomes weak. The user sees two different images but doesn't always understand what exactly has changed.

No clear labeling of "before" and "after"

When photos aren't captioned and aren't grouped, the user has to guess which one belongs to the initial state and which to the final state.

Lack of context

If the report contains only close-ups but lacks an overall view of the area, it's difficult to understand where exactly the object is located and how significant the changes are.

Too few explanations

Even good visual material often needs brief captions. Without them, it may be unclear what exactly is being compared and what result the reader should see.

Overloading the report

If a single document contains too many photos without grouping and logic, the before and after format stops working as a quick comparison tool and becomes just a long list of images. To avoid these problems, you need to think through the shooting logic, image order, and page structure in advance.

How to create a before and after photo report online

Using a specialized service allows you to avoid assembling this document manually and quickly form it in a structured way. This is especially convenient if reports need to be created regularly or if multiple people are involved in the work. Usually, the process looks like this:

  • First, the initial state of the object is recorded.
  • Then the work or changes are performed.
  • After that, photos of the final state are taken.
  • All images are uploaded to the system.
  • The photos are sorted and combined into logical blocks.
  • If necessary, captions and explanations are added.
  • The finished document is generated for sending to the client, manager, or for archiving.
This approach speeds up report preparation, reduces the number of errors, and makes the result more professional.

Advantages of online before and after photo report

Compared to manual document preparation, the online format offers several practical advantages.

  • First, it saves time. There's no need to manually insert images into an editor and spend time aligning the document structure.
  • Second, it helps maintain a unified reporting standard. This is especially important for companies where photo reports are created by different employees, subcontractors, or service teams.
  • Third, it simplifies working with a large number of photos. With proper sorting and grouping, the document remains understandable even with a large volume of material.
  • Fourth, the finished report is easier to send to the client, attach to internal documentation, or use as confirmation of completed changes.
As a result, the online before and after photo report turns out to be not only more convenient but also stronger as a working tool.

Where this format is particularly useful

The "before and after" format is useful where the result must be obvious without lengthy explanations. In practice, it works especially well in several typical scenarios.

For contractors and service companies

Contractors use such reports to show the client the completed work and confirm the result in an understandable form. This helps to agree on phases faster and reduce the number of contentious issues.

For management and operation services

When maintaining buildings, engineering systems, and grounds, the before and after format helps document changes after addressing comments, repairs, and regular work.

For cleaning and landscaping

Here, the photo report is particularly convincing because the visual result is the main proof of the quality of work.

Used guides

To prepare such a photo report faster, it's useful to rely on related guides. They help not only to compile the document but also to choose a more successful logic for placing photos.

Together, these materials simplify report creation and help achieve a clear result faster.

Used features

For preparing a before and after photo report, the features that affect the clarity and structure of the document are especially important.

  • Photo sorting – allows you to correctly arrange pairs and block sequences so that the comparison logic is obvious.
  • Report layout settings – help choose a page format in which the before and after photos are perceived as comfortably as possible.
  • Create a photo report – combines photos, structure, and export into a single final document.
If these features are used together, the document becomes not just neat, but truly convenient to read and analyze.

FAQ

It's a document in which photos show the condition of an object before work begins and after it is completed, to visually demonstrate the changes.
It's used in construction, repair, cleaning, service work, facility operations, inspections, and other scenarios where the visual result is important.
It allows for a quicker understanding of what exactly has changed and makes the result clearer for the client, manager, or inspector.
Comparable shots of the same area work best: overall view, detail, and final state after the work.
Yes, even brief captions help understand what exactly is shown in the photo and what the change consists of.