Frequently Asked Questions about Photo Reports and Photo Tables
Answers to the most common questions about creating professional photo reports, photo tables, and visual documentation for inspection and construction. Learn best practices and tips.
Frequently Asked Questions about Photo Reports and Documentation
What is photo documentation or a visual evidence report?
Photo documentation is a formal visual evidence report.
It consists of systematically arranged, numbered, and captioned photographs that objectively record site conditions, work progress, damage, or installations.
These reports are crucial for construction monitoring, insurance claims, property inspections, and providing verifiable proof for legal contexts or expert assessments, ensuring a clear and indisputable audit trail.
Within such a report, photographs are typically organized in a structured table or layout, each with a unique number and explanatory caption. Annotations like arrows, circles, or text can be added directly onto the images to highlight specific details.
How do I create a photo report online?
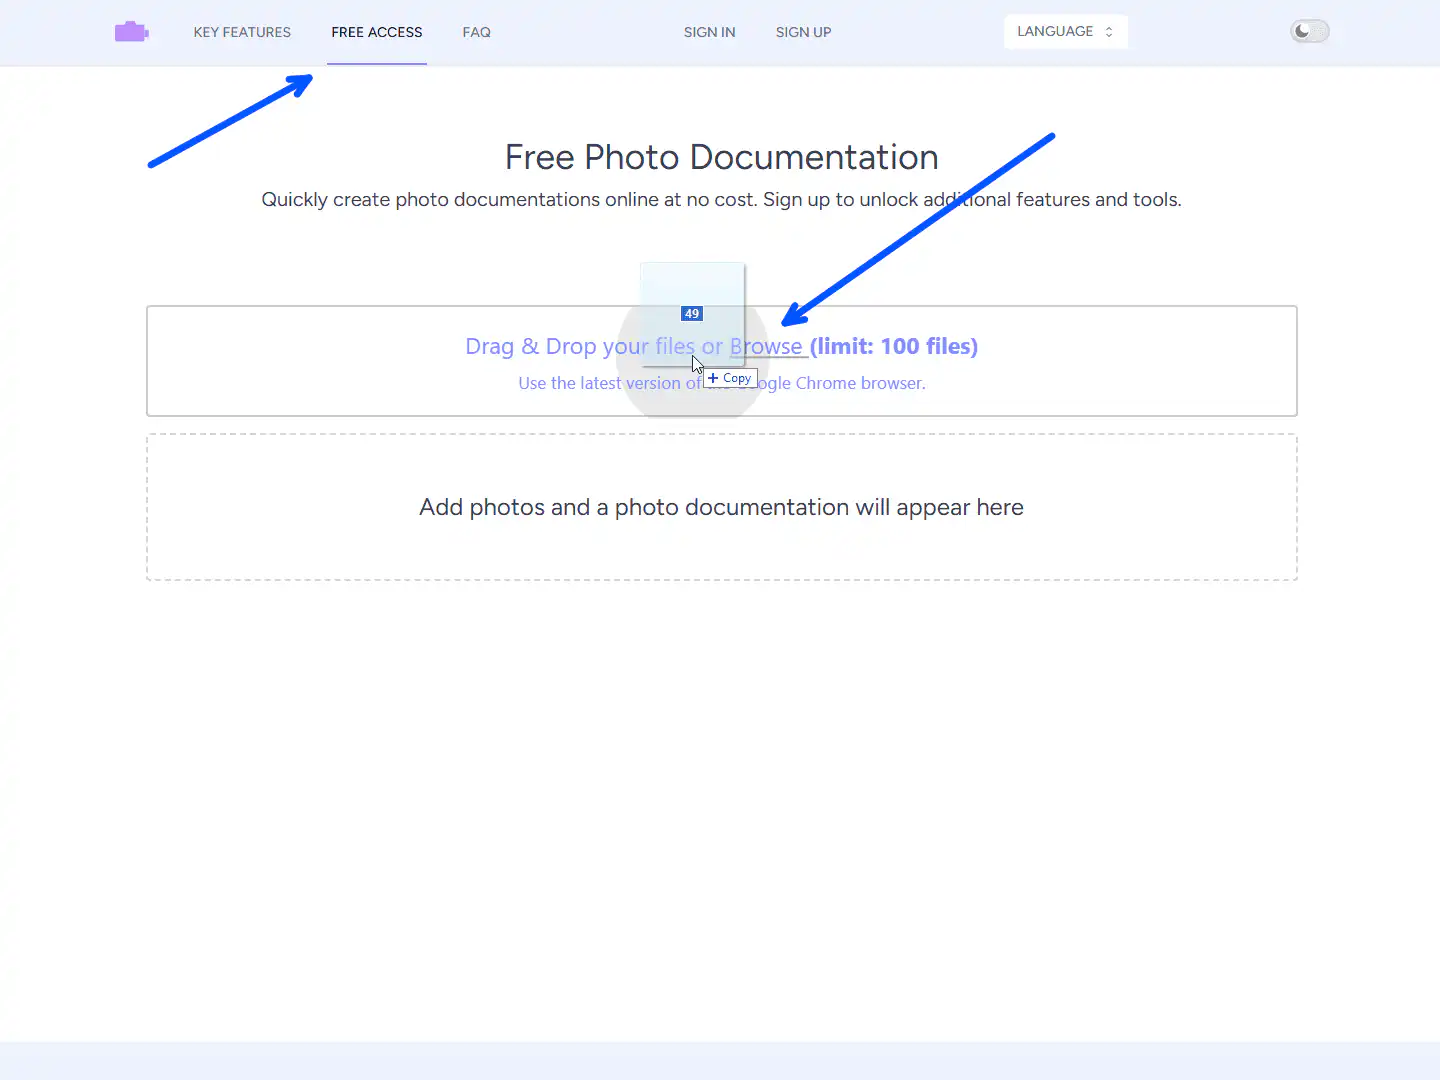
Creating a professional photo report is straightforward. Simply upload your images to Photo-reports.online.
Our service will automatically organize them into a structured, numbered table format.
With one click, you can download a ready-to-use .docx file, fully compatible with standard word processors like Microsoft Word, Google Docs, and LibreOffice Writer for immediate use in inspections, audits, or client documentation.
How can I add captions or annotate photos in a report?
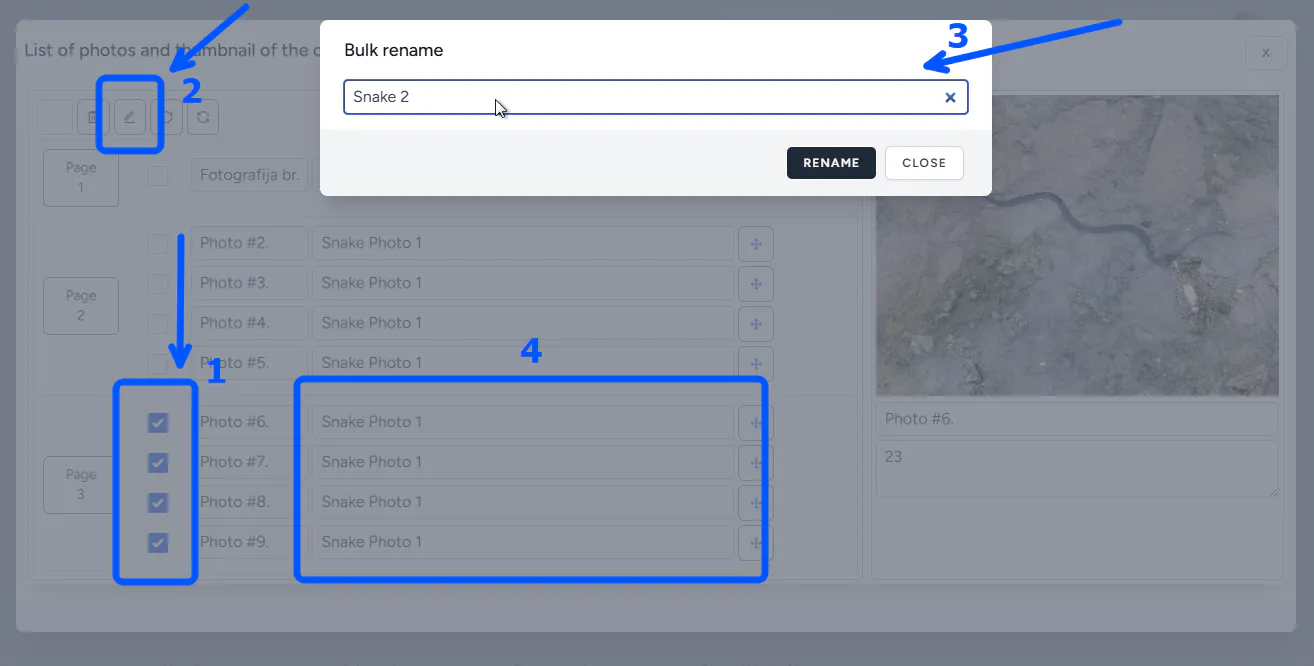
Our platform offers several efficient methods for labeling photos to ensure clarity and professionalism in your documentation:
1. Individual Captioning: Add unique descriptions to each photo directly via the keyboard.
2. Batch Captioning: Apply a single caption to multiple selected photos simultaneously, ideal for documenting similar items or stages.
3. Caption Templates: Registered users can save and re-use standard description templates from a dropdown list, ensuring consistency across reports.
Additionally, you can add direct annotations like arrows, circles, or text callouts onto the images themselves to highlight specific details.
What templates are available for photo reports and how customizable are they?

We offer five professional templates designed to meet over 95% of documentation needs. The simplest way to start is by using the default template in Photo-reports.online.
Each template is highly configurable to match your corporate or project standards. Available settings for most templates include:
- Page Layout: Choose between Portrait or Landscape orientation.
- Structure: Set the number of rows and columns (up to 8).
- Captions: Define the number of text lines (default 1, max 8) and the size ratio between images and text.
- Design: Adjust fonts, border thickness/color/offset, margins, and the alignment of titles and captions.
The five core templates are:
1. Main Table Template: Default layout with 2 columns and 4 rows.
2. Left-Aligned Photos: Photos on the left, captions on the right (default 4, max 8 photos). Allows adjustment of photo and caption width by percentage.
3. Right-Aligned Photos: Photos on the right, captions on the left (settings mirror template 2).
4. Top-Aligned Photos: Photos at the top, captions below (default 2, max 8 photos). Allows adjustment of photo and caption height by percentage.
5. Bottom-Aligned Photos: Photos at the bottom, captions above (settings mirror template 4).
Photo Documentation: 'Before & After' and Work-in-Progress Reports
How many photos do I need for a 'before and after' report?
There is no universal number. Focus on capturing all critical aspects and stages from consistent angles. A good practice is to take multiple photos of the same feature to ensure clarity and coverage. The key is to provide a complete, unambiguous visual story of the change. Our online tool helps you organize these photos into a clear, sequential report regardless of volume.
What makes a 'before and after' report suitable for contractual handover or dispute resolution?
For contractual or evidential strength, a report must demonstrate an unbroken, documented chain of events. This is achieved by using tools that embed metadata (time, date, optional GPS) and by maintaining consistent photographic perspective. The structured, time-sequenced format provided by professional documentation tools transforms a simple series of photos into a credible, verifiable record of progress or condition change.
What are common mistakes to avoid when creating a 'before and after' photo report?
The main pitfalls are inconsistency and poor documentation. Avoid: changing camera angles or distances between shots, failing to capture all relevant areas, mixing photos from different days without clear labeling, and lacking chronological order. Our service mitigates these risks by providing tools for easy sequencing, standardized captioning, and report templates that enforce a logical structure.
How do I create a proper 'before and after' work progress photo report?
To create a professional 'before and after' report, follow these steps:
1. Photograph the object from consistent angles before work begins.
2. Document key progress stages using the same angles and distances.
3. Capture the final result from the original vantage point.
4. On Photo-reports.online, use drag & drop to arrange all photos in the correct chronological sequence.
5. Add clear, consistent captions to each stage, using bulk captioning or saved text templates for efficiency.
6. Place the most illustrative 'before' and 'after' shots on the first or final page.
7. Use the built-in editor to add clarifying annotations, arrows, or text to highlight changes.
Mobile Inspection App: Frequently Asked Questions
Does the app work offline?
Yes. The INSPECTOR app supports two operational modes for flexibility in the field:
1. Instant Sync: Photos and data are uploaded to your account as they are taken.
2. Deferred Sync: Photos are saved securely to the device's local storage. All captured context (GPS, timestamps) is preserved. The photos are then queued and automatically synchronized with your online account when an internet connection is re-established, ensuring no data loss.
How do I add GPS location and coordinates to my inspection photos?
The INSPECTOR mobile app offers two methods to attach geolocation data to your photos:
1. Profile Setting: Enable a default flag in your user profile to automatically tag every photo you take with the device's GPS coordinates and approximate address.
2. Per-Session Control: Choose to activate location tagging at the start of each specific inspection session or camera use, giving you precise control over when metadata is collected.
How are timestamps added to photos?
Timestamps (date and time) are embedded seamlessly. You can:
1. Set a Default: Activate an option in your user profile to automatically stamp every photo.
2. Control Manually: Choose to enable the timestamp function only when initiating the camera for a specific task. This ensures metadata is added only when required for your documentation.
How does the app help verify the authenticity of photo evidence?
The INSPECTOR app employs a context-verification approach, creating a secure 'digital fingerprint' for each photo by recording the circumstances of its capture. This includes:
- Temporal Data: Precise device timestamps for creation and modification.
- Geospatial Data: GPS coordinates and location accuracy at the moment of capture.
- Device Data: A unique device ID, model, OS, and app version.
- Process Data: Links to the specific inspection event and sequence.
This multi-layered context makes it highly impractical to falsify all elements of the photo's origin after the fact, providing a transparent and auditable trail.
Photo Authenticity & Context Verification
In which situations is photo authenticity verification most needed?
Context verification is particularly valuable in fields where photographic evidence supports critical decisions or records, such as: construction progress claims, insurance damage assessments, property condition inspections, compliance auditing, supply chain documentation, and preliminary legal evidence gathering. It adds a layer of accountability to visual documentation.
Can you verify a photo's authenticity without analyzing the image itself?
Yes. Our context verification method does not analyze image pixels for manipulation. Instead, it examines and validates the documented circumstances of the photo's creation: the precise when, where, and how it was taken, based on data captured by the device and app during the shooting process.
Do you check if a photo has been edited?
No. The context verification process is not designed to detect image editing (e.g., Photoshop alterations). A photo can be edited yet still have a verifiably authentic creation context if it was captured and documented correctly within our system at the claimed time and place.
How is context verification different from AI image analysis?
AI image analysis interprets visual content, often making probabilistic judgments about objects or manipulations. Context verification relies on recorded, factual device and process data (timestamps, location, device IDs) that form a reproducible audit trail. This makes it explainable and based on concrete, recorded events rather than visual interpretation.
Can you prove the exact location where a photo was taken?
Context verification confirms the location data (GPS coordinates) that was recorded by the device at the moment of capture. It confirms what the device reported, not the absolute geographical truth. Factors like GPS accuracy or spoofing are noted as part of the transparency report, so users can assess the reliability of the location data provided.
Is this verification suitable for legal or expert tasks?
Context verification does not replace a formal forensic expert examination. However, it provides a robust, supplementary source of transparent and reproducible metadata. This data can be valuable for internal audits, dispute resolution, and providing supporting documentation for expert analysis by offering a clear record of the photo's provenance.
Can the shooting context be faked?
Our system is designed to prevent retroactive alteration of the core contextual data (time, device ID, sequence). While no system can guarantee 100% impermeability against all possible attacks (e.g., a rooted device), the model is built to make post-hoc forgery economically and practically unviable for most real-world scenarios by securing the data chain at capture.
Does verifying the context prove an event actually happened?
No. Context verification confirms the circumstances under which a digital photo file was created on a specific device. It does not, and cannot, independently prove that the event depicted in the photo's content objectively occurred in reality. It verifies the digital provenance, not the content's truth claim.