logo

Documentation for the INSPECTOR Mobile App

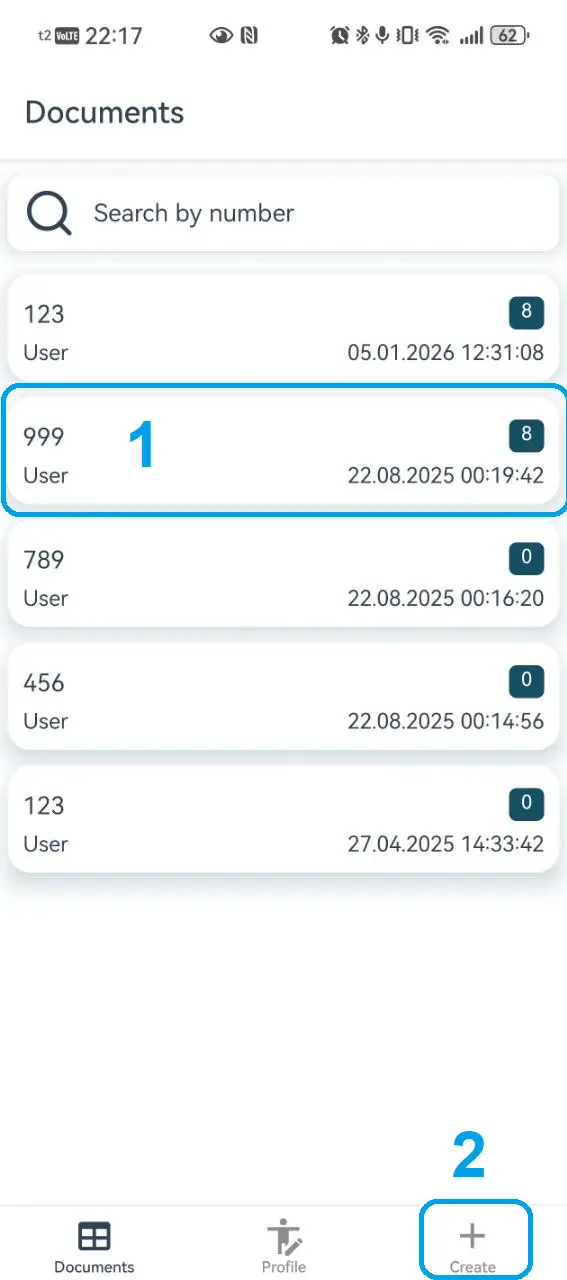
Documentation for the INSPECTOR mobile app: installation, creating photo reports, offline mode, data synchronization, and working with photos.

Installation and Getting Started with INSPECTOR

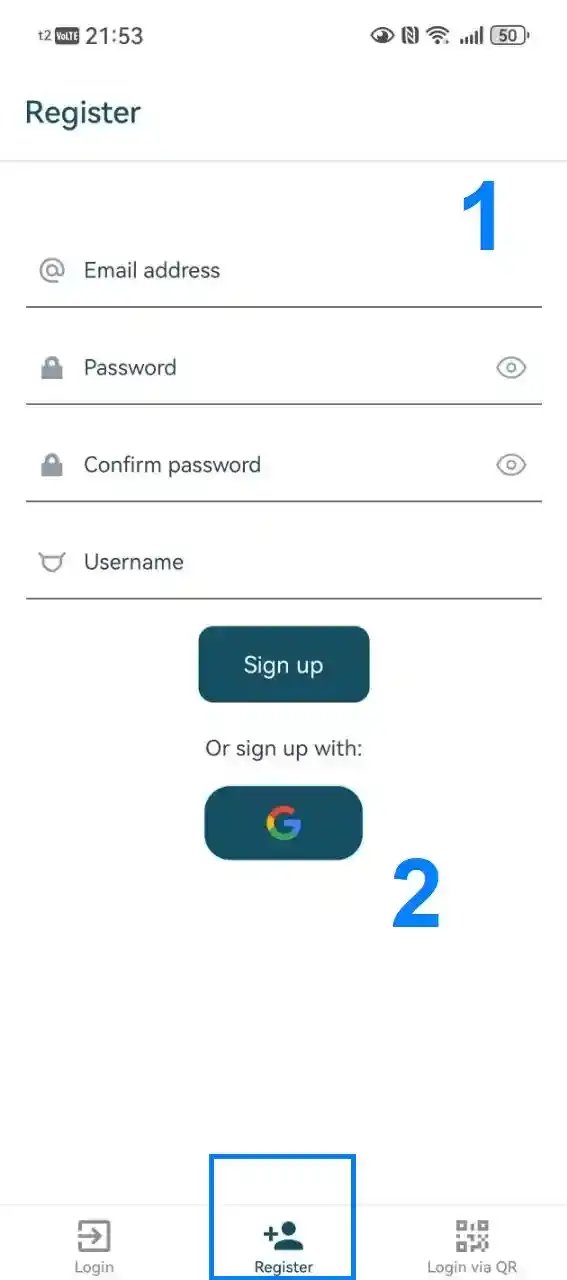
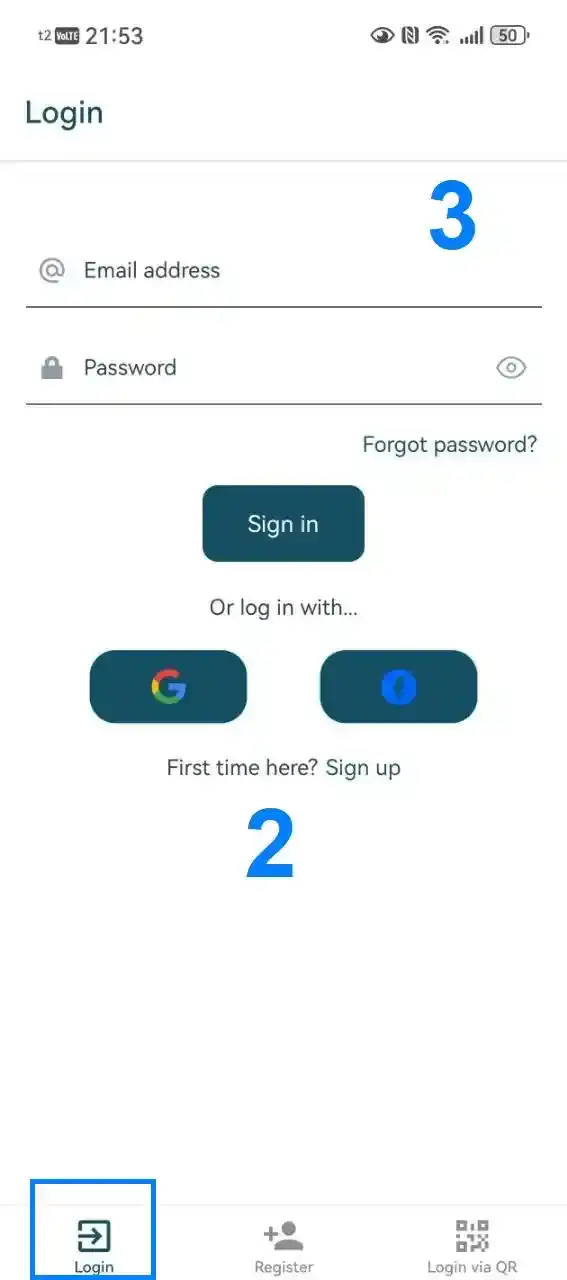
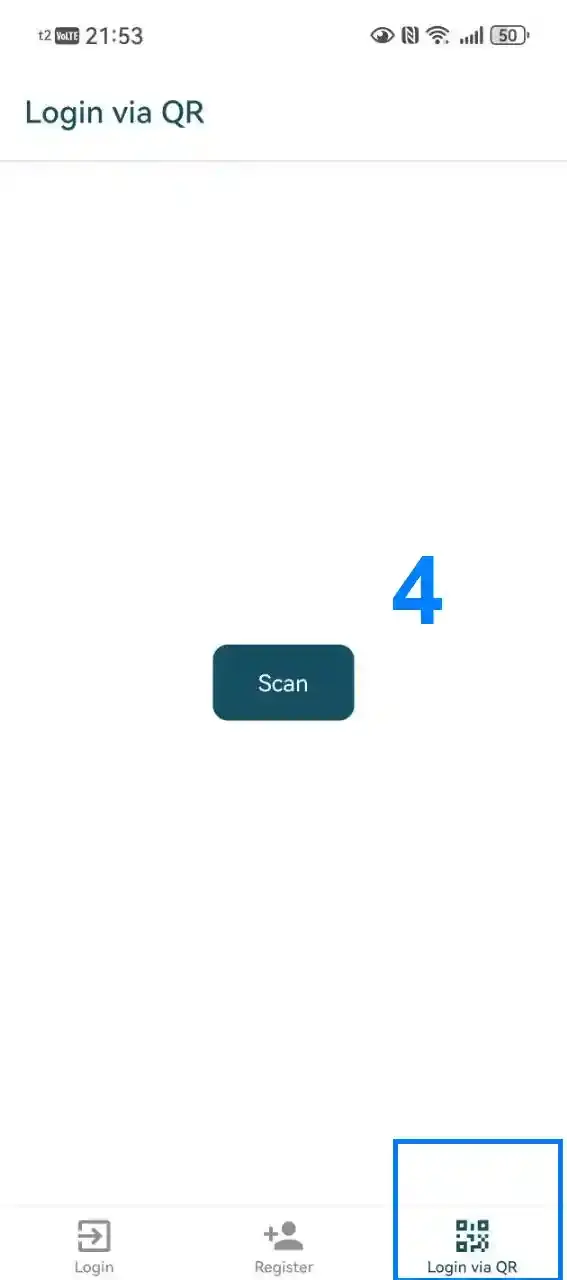
The INSPECTOR mobile app for photo documentation during inspections is available for devices running Android OS. Users can choose from various installation and authentication methods to start creating photo reports.

Login and Authentication in the INSPECTOR App

Image 1
Image 2
Image 3
The INSPECTOR mobile app uses the same user account as the Photo-reports.online web service. This allows you to work with photo reports both in the mobile app and in your personal account on the website. Several authentication methods are available:
  1. Via the login form within the mobile app;
  2. Via third-party services, e.g., using a Google account;
  3. If you already have a Photo-reports.online account, simply enter your email and account password;
  4. By scanning a QR code of an API token created in the 'API Tokens' section. This method is suitable for granting account access to other users without sharing your password.

Creating Your First Photo Report in the App

Image 1
Image 2
Image 3
Image 4
Image 5
Image 6
Image 7
  1. If the document already exists, open it.
  2. If no document exists, create a new one.
  3. On the photo report creation screen, basic settings are available (advanced settings are available in the web version on each photo report's page): 3.1. Document Name – the title that will appear above the photo table. 3.2. Document Number – added to the document name, displayed in the document list. 3.3. Template Type – 5 photo report templates are available: A. Default template – table with 2 columns and 4 rows. B. Photo report with images on the left and captions on the right (default 4 photos, max 8). Photo and caption width can be adjusted as a percentage. C. Photo report with images on the right and captions on the left (settings analogous to template B). D. Photo report with images at the top and captions below. The height of photos and captions can be adjusted as a percentage, as well as the number of photos (default 2, max 8). E. Photo report with images at the bottom and captions above. Settings analogous to template D. 3.4. Number of Rows – the number of photo rows in the photo report table. 3.5. Number of Columns – the number of photo columns in the photo report table. 3.6. Landscape Orientation – when enabled, photo report pages will be oriented horizontally instead of vertically.
  4. After creating the new photo report, it becomes available in the list on the app's main screen.

Capturing with the Mobile Inspection App's Camera

INSPECTOR allows photo documentation directly within the mobile app. This section describes capture features, adding coordinates, address, and timestamps to photos, as well as camera operation specifics during inspections.

Taking Photos with the Built-in Camera

Image 1
Image 2
Image 3
The camera is one of the main tools of the INSPECTOR mobile app. Below is a detailed description of the capture process and available functions. 1. Tap the camera icon in the top-right corner of the screen to take a photo. 2. On the right side of the camera screen, action buttons are available during capture.

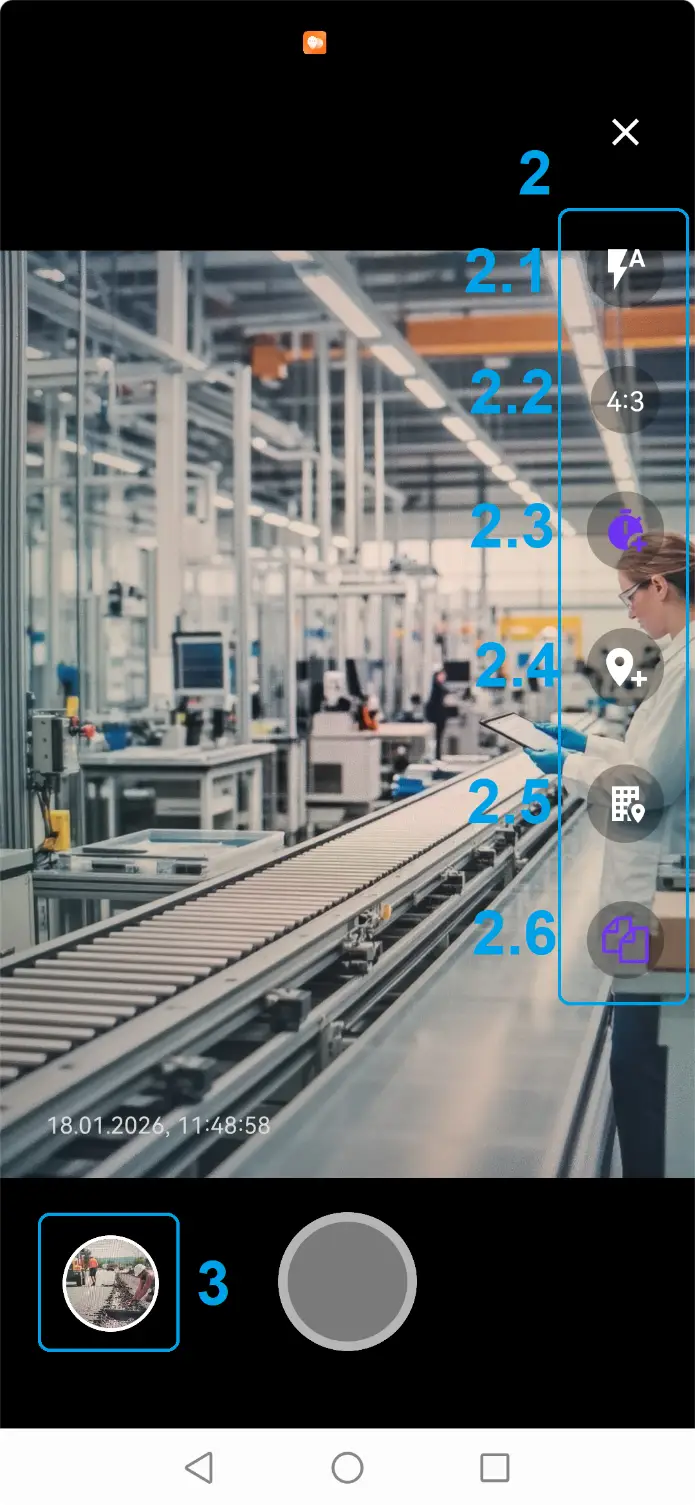
2.1. Flash with three modes: on/off/auto. Updated for each capture session.

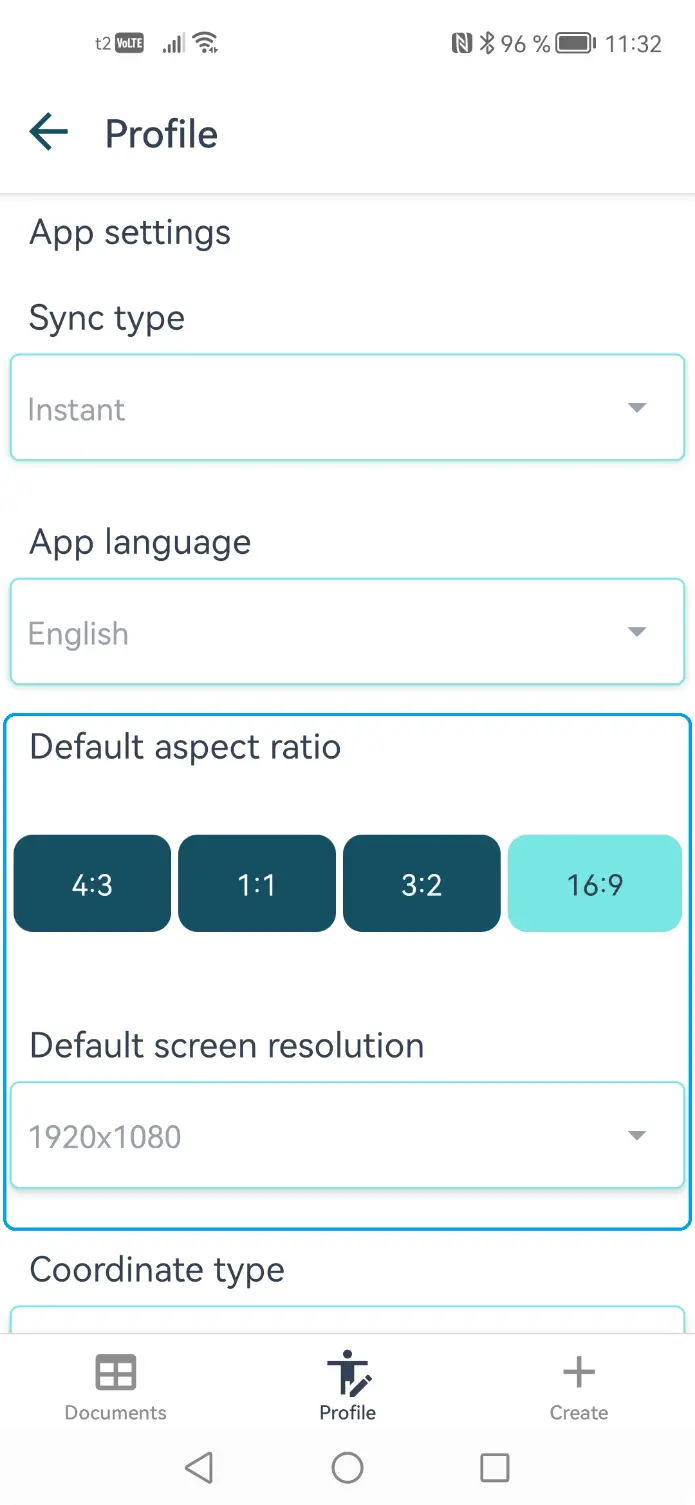
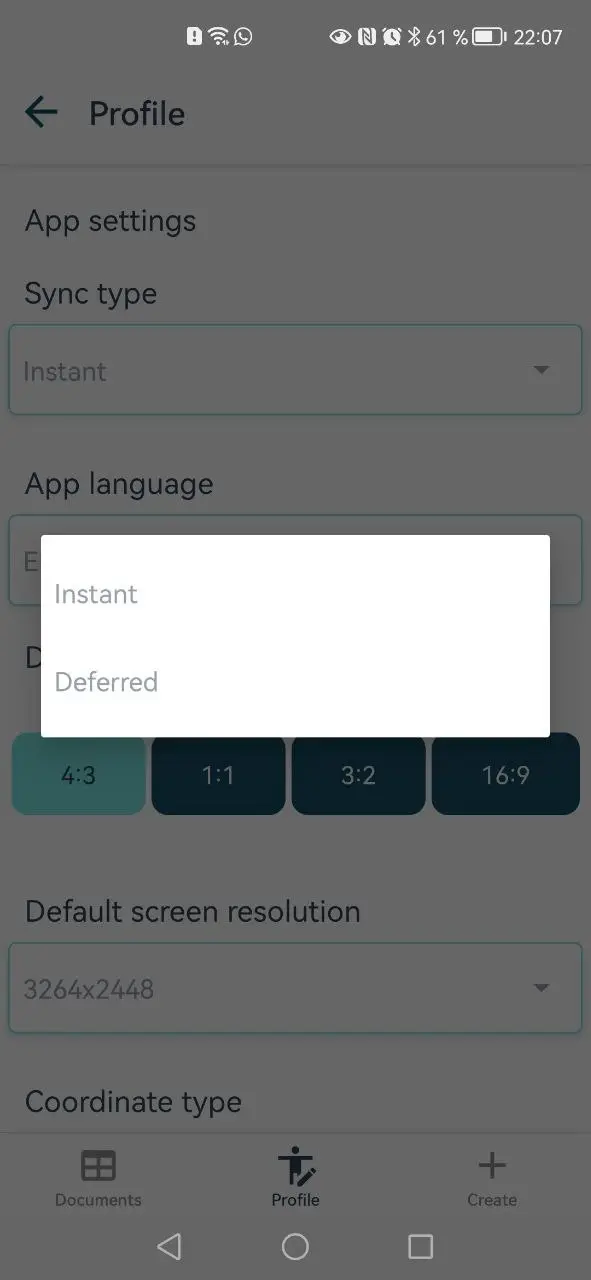
2.2. Aspect Ratio – available formats: 4:3 (recommended and set by default for each new capture session), 3:2, 16:9, 1:1.

2.3. Show Time – if enabled, a timestamp with date and time will be overlaid in the bottom-left corner of the image.

2.4. Show GPS Coordinates – if enabled, GPS coordinates will be overlaid in the bottom-left corner of the image.

2.5. Show Address – if enabled, the address determined during capture will be overlaid in the bottom-left corner of the image.

2.6. Reference Shot – if enabled, the original image without overlays will be saved in the device gallery in the INSPECTOR album.

3. After capturing each frame, it can be edited in the image editor, accessible via the icon to the left of the capture button. Default settings for some capture functions can be configured in the user profile (see screenshots).

Adding Coordinates to Photos

Image 1
Image 2
Adding coordinates to photos can be set to apply automatically to every shot or only for a specific session (app launch). To add coordinates to every shot during capture, go to the profile screen and toggle the corresponding option. In the profile, you can also choose the display format for GPS coordinates: 1. DD (Decimal Degrees) – coordinates are expressed as decimal fractions: the integer part is degrees, the fractional part is decimal degrees. This format is used by default in the mobile app. 2. DM (Degrees and Minutes) – degrees and decimal minutes are indicated. 3. DMS (Degrees, Minutes, Seconds) – degrees, minutes, and seconds. If you need coordinates only for a specific shot, enable the option on the right side of the capture screen. More details about determining the capture location can be found on the pages Geolocation in the INSPECTOR Mobile App and Photo Authenticity Verification.

Adding the Address to a Photo

The address can also be added to a photo in two ways – either as a default setting or by requesting it in each capture session. The address is determined based on the device type, source data, and available sources. More information about address determination can be found on the page Geolocation in the INSPECTOR Mobile App.

Adding the Capture Time to Photos

The date and time of capture can be added to photos in two ways – by default for all shots or only for the current app session. When added, the date and time format corresponding to the mobile app's language setting is used.

Saving Capture Context on the Server

In the mobile app's user profile, you can enable saving the capture context on the server. The capture context is an important tool of the INSPECTOR mobile app, used to confirm photo authenticity and document the conditions of capture. More details can be found on the page Photo Authenticity Verification.

Saving a Reference Shot

Image 1
When the option to save a reference shot in the device gallery is enabled, the captured image before overlaying time, coordinates, and address is saved in the device gallery. This option can be used when a high-resolution image is needed for further in-depth examination of the inspection object, e.g., for identification or diagnostic expert assessments. Please note that the reference shot is saved with the resolution and aspect ratio specified in the user profile. By default, the most common aspect ratio 4:3 and a medium resolution available on the device for that aspect ratio are chosen. Choosing a higher resolution on low-power mobile phones and tablets may significantly increase image processing time during capture.

Image Editing

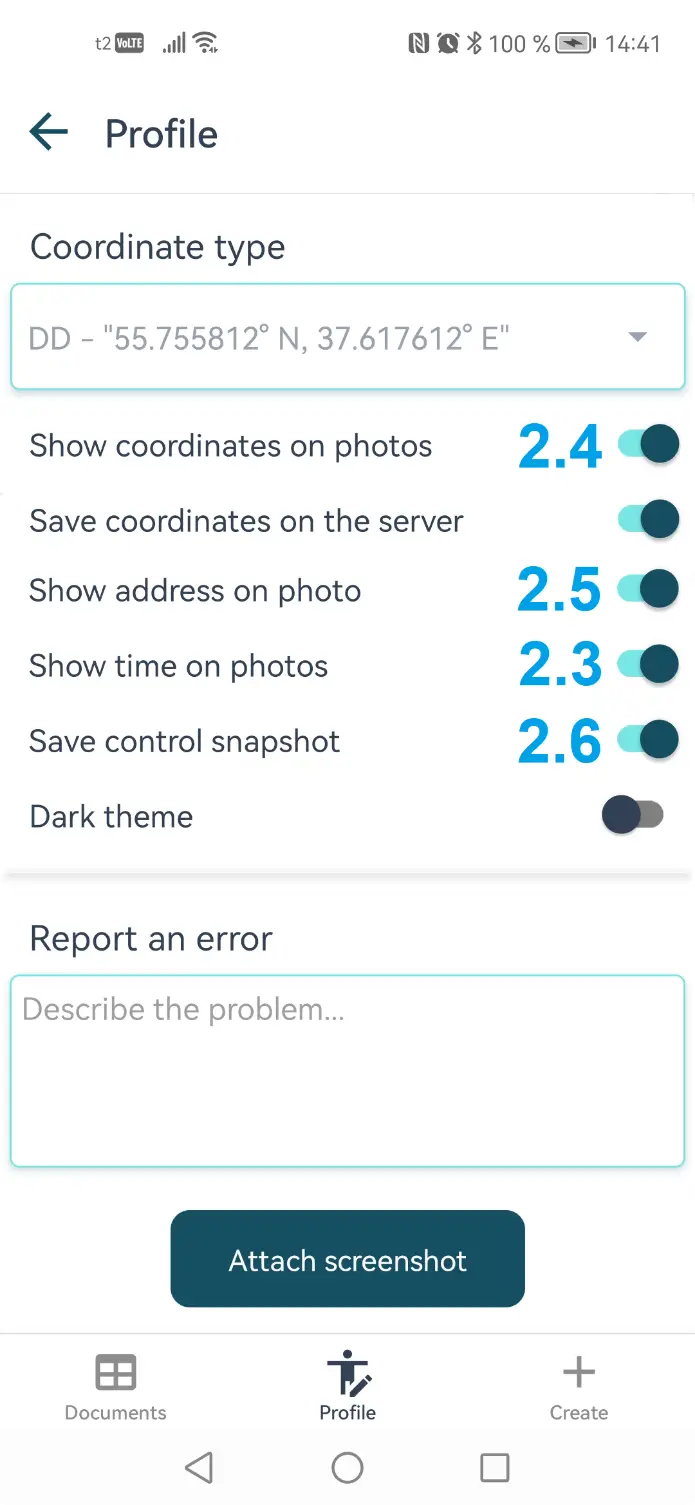
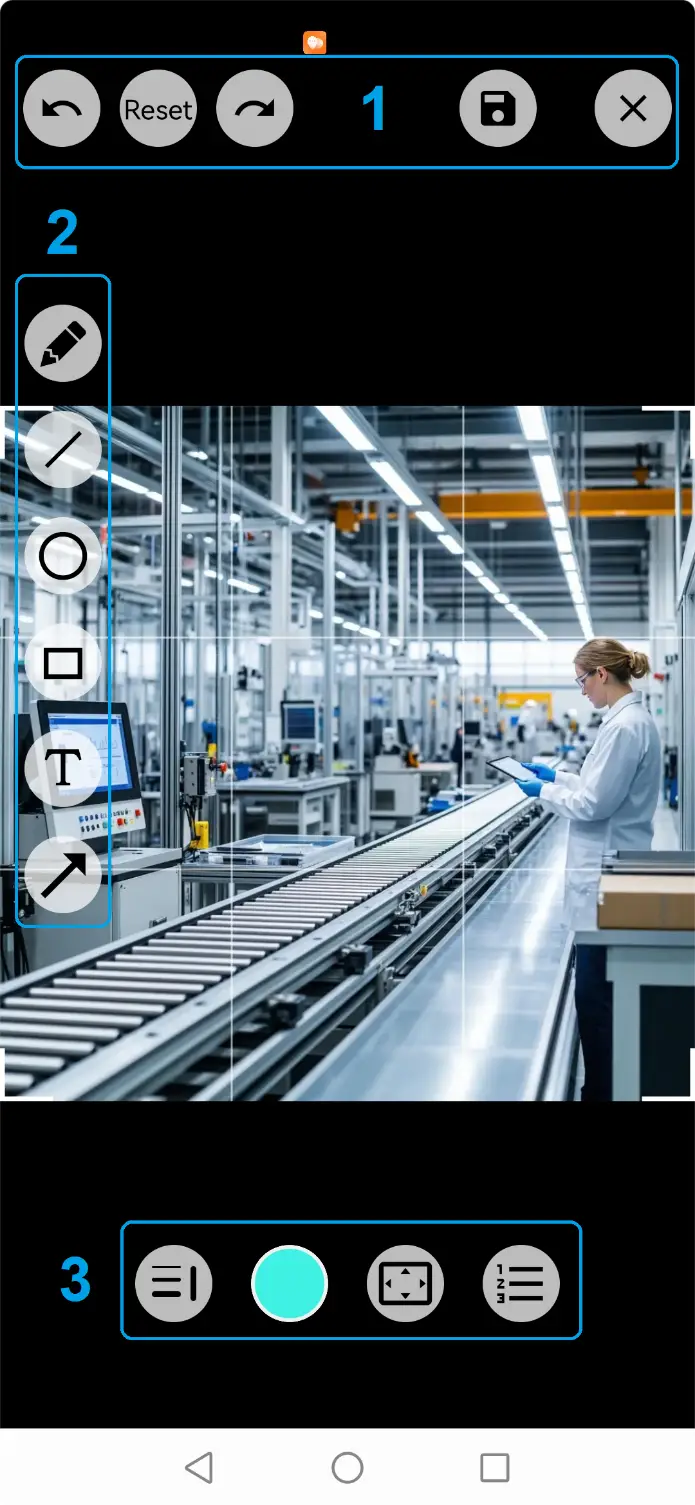
The INSPECTOR app includes tools for editing and processing photos. This section covers functions like rotating images, numbering, adding captions, and other ways to prepare photos for inclusion in the report.

Image Editor in the INSPECTOR App

Image 1
Image editing is available in two scenarios:
  • Immediately after capturing a new image with the camera, an icon of the last shot appears to the left of the capture button. Tapping it opens the full-featured photo editor.
  • The same photo editor opens when you tap a photo in any document.
The photo editor contains three panels of buttons:
  1. The top button panel contains buttons (from right to left): close editor, save image, undo changes to drawings made on the photo, and reset all drawings made on top of the photo.
  2. The left button panel contains shapes that can be drawn on top of the photo, as well as a button to create a text area.
  3. The bottom button panel contains (from left to right): - a line thickness selection panel; - a line color selection panel; - a panel with buttons for rotating and flipping the image, adjusting the image to fit the selected frame, and fitting the frame to the existing image fragment; - a button that opens a form for entering the image number and description.

Adding Descriptions to Photos in a Photo Report

Image 1
In the INSPECTOR mobile app, several options are available for adding descriptions (captions) to photos:
  • In the Image Editor – Tap the right button on the bottom button panel (see screenshot above) to add a description for a specific image, and enter text using the keyboard.
  • Batch Captioning of Photos – with text or using the keyboard microphone (see section Batch Actions on Photos).
  • On the Photo List Screen – Navigate to the photo list screen, where you can conveniently monitor several images at once. Tap the field to the right of the target image; a form for entering the image number and description will appear.
  • Using Standard Captions – In the web version of the photo-reports.online service, you can create a list of frequently used standard captions. If such a list exists in the user's team profile, it will appear below the text input field when editing a caption in the mobile app. Select the desired entry, and it will appear in the caption input field.
Using the Microphone of the on-screen keyboard for voice input of photo descriptions is another powerful feature of modern mobile devices. Dictate the photo description into the on-screen keyboard's microphone, and it will automatically insert the text into the input field – you only need to tap save. With this function, even complex objects and processes can be described.

Batch Actions on Photos in a Photo Report – Delete, Describe, Rotate, Sort, Number

Image 1
To speed up the creation of a high-quality photo report, use batch actions on photos. To do this, go to the desired document and long-press any photo on the main screen. A panel with batch action buttons will appear at the bottom of the screen. The button descriptions (from left to right):
  • Checkbox – Tapping selects all photos or deselects all photos.
  • Trash – Deletes all selected photos.
  • Pencil – Batch captioning of selected photos with a single description. The description can also be added via the keyboard microphone.
  • Rotate – Batch rotates selected photos left or right around the image center.
  • Sort in List – Opens the photo list for easy sorting within the photo report. Long-press an element in the list to drag it up or down.
  • Batch Numbering of Photos – Specify a prefix for numbering the photos. After applying numbering, all photos in the report will be numbered sequentially – the numbers will appear after the prefix.

Configuring the Photo Report and Managing Photos

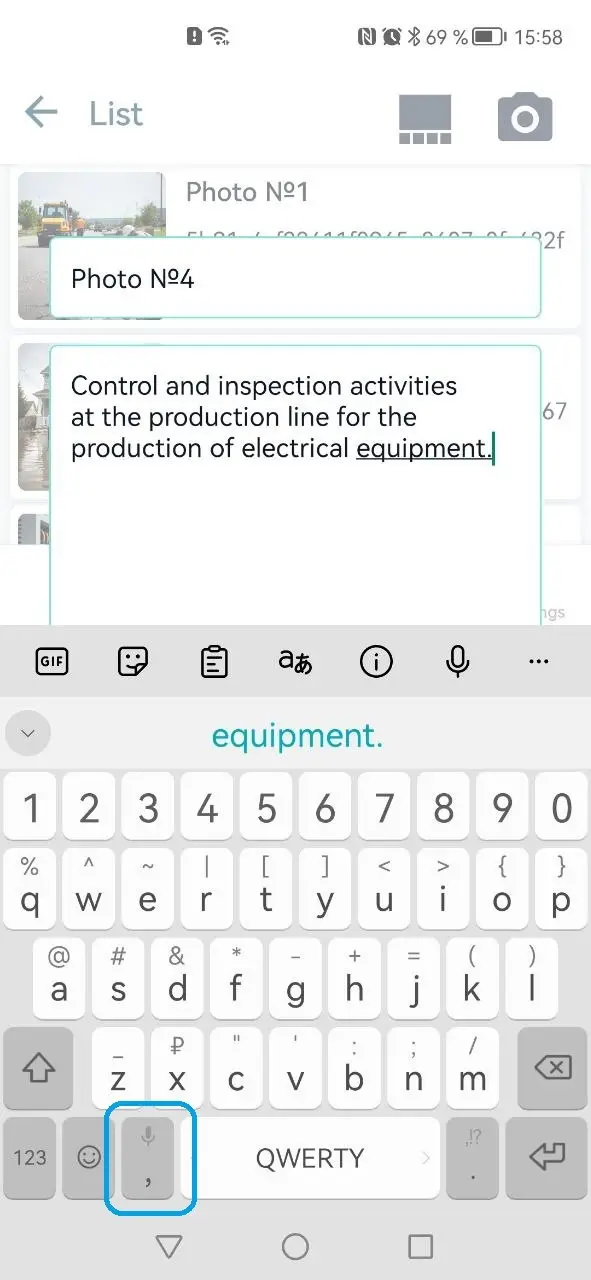
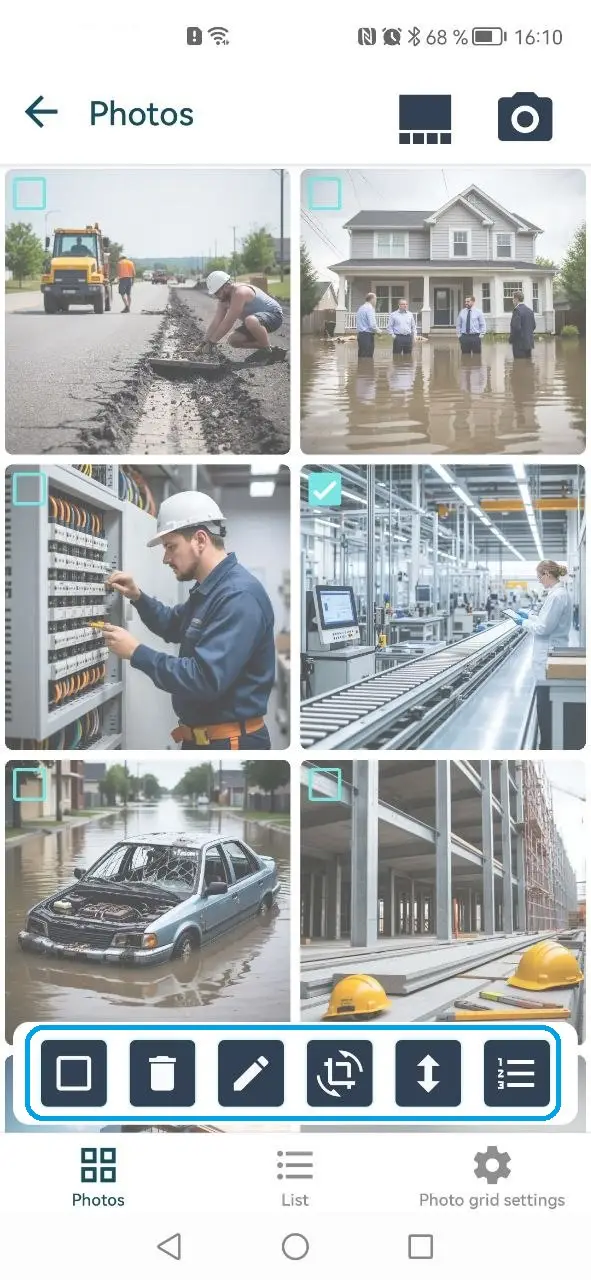
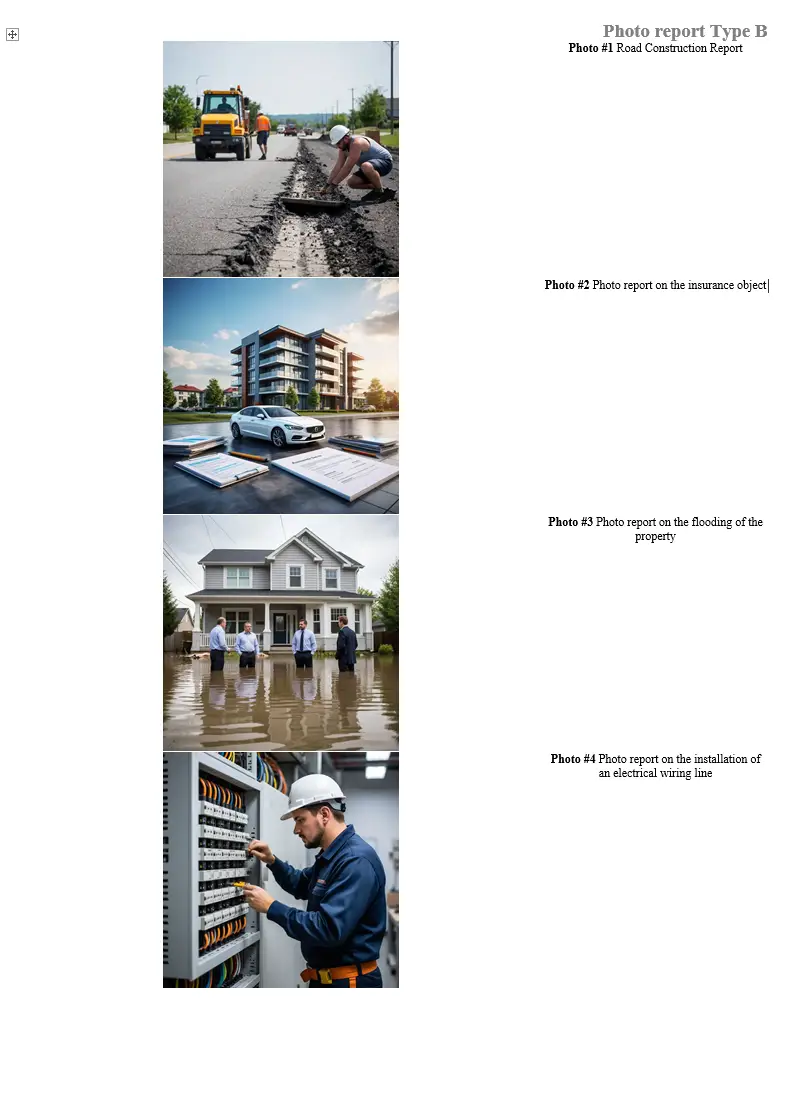
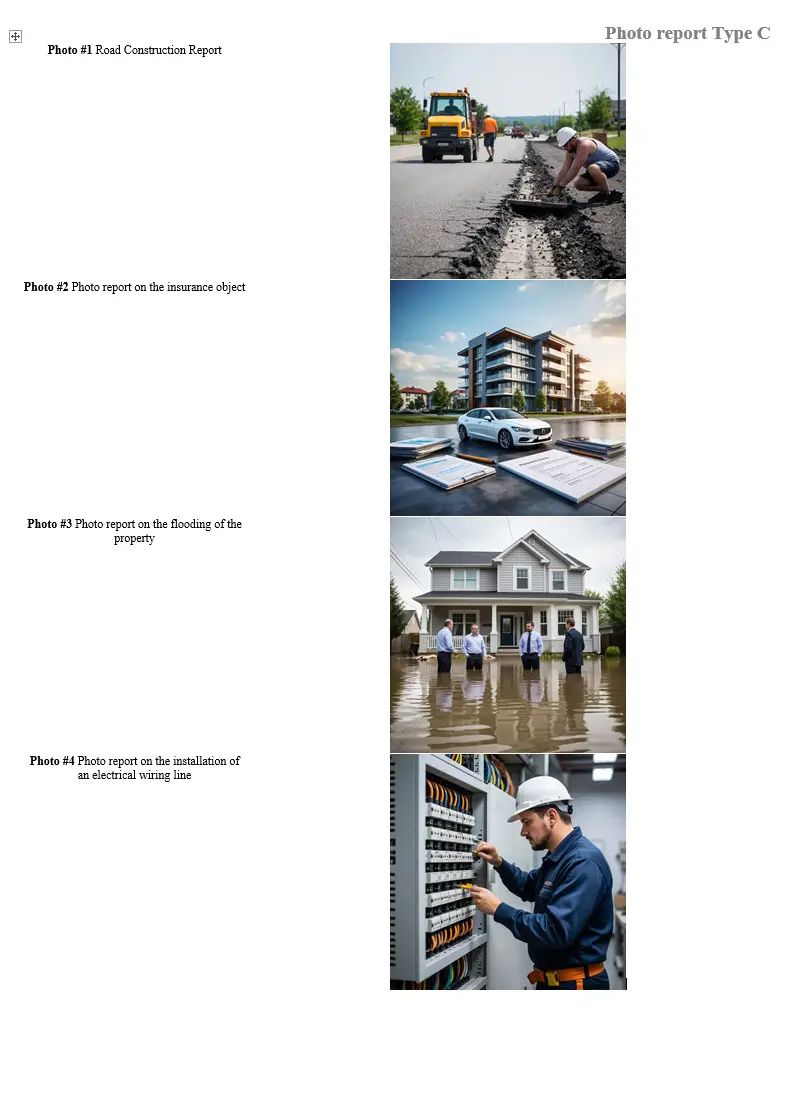
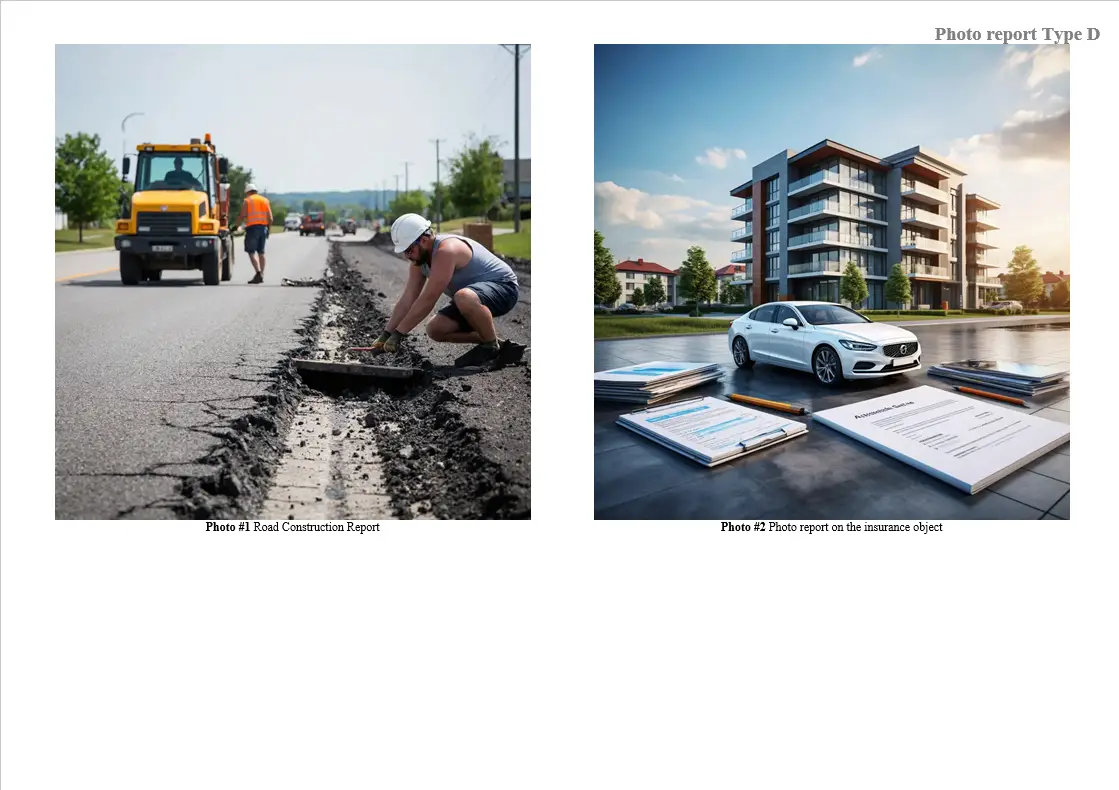
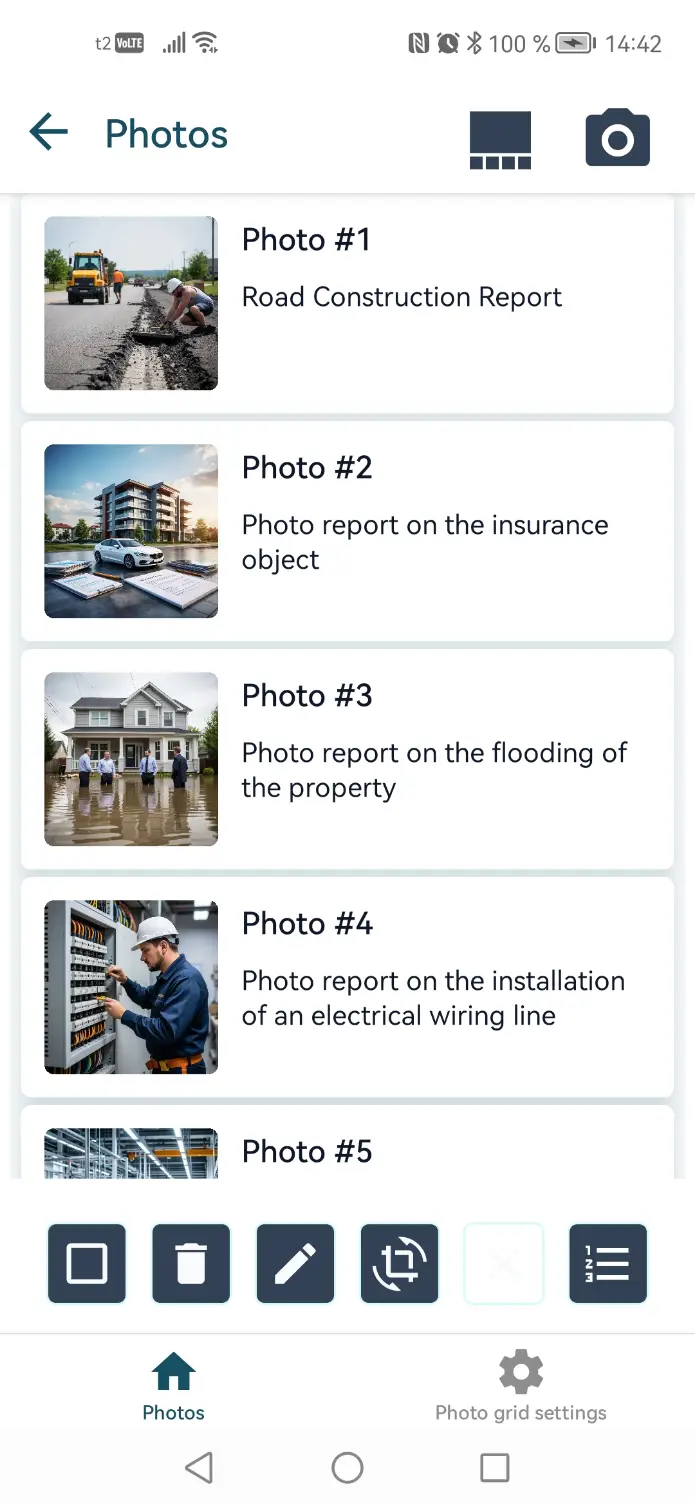
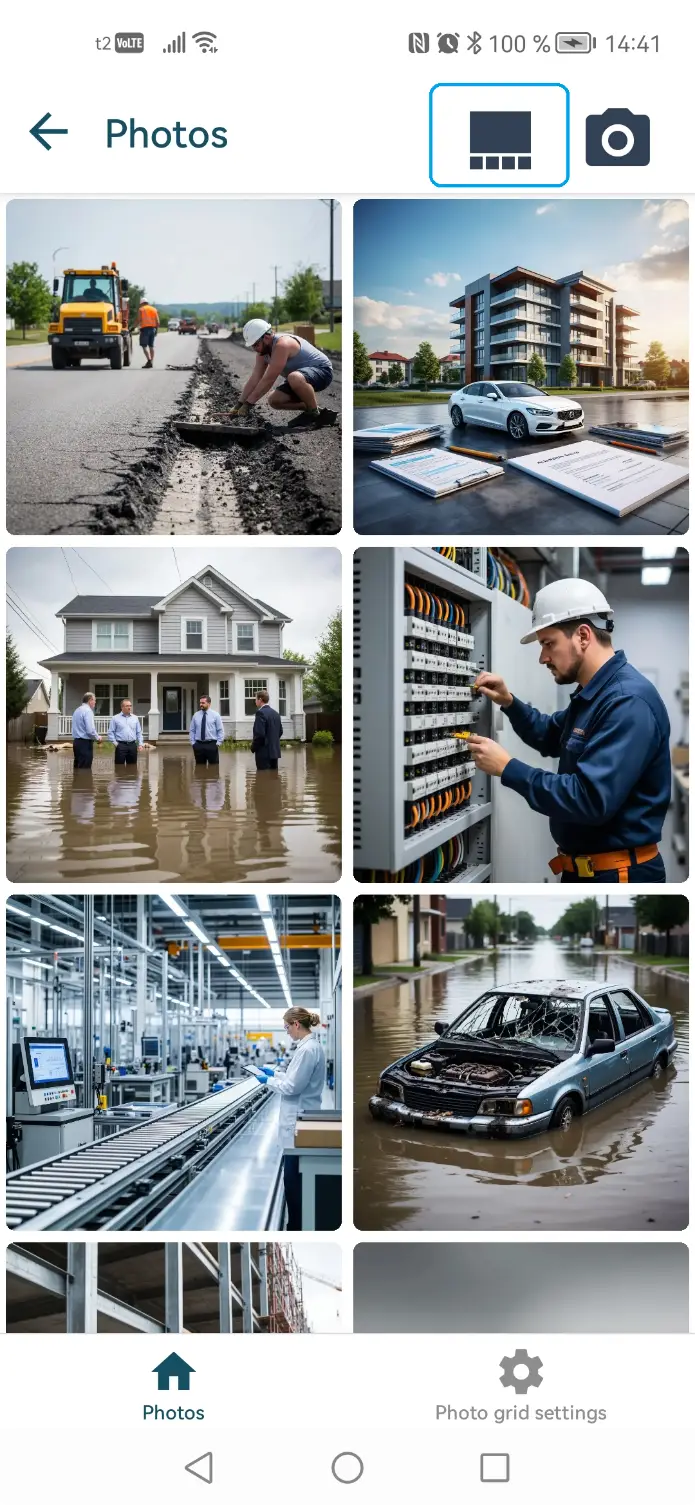
This section describes the tools for managing photos within the report. Users can sort images, change their order, add photos from the gallery, and adjust the structure of the photo report.

Sorting Photos in the Report

Image 1
The order of photos in the report can be changed using the sorting tool, available on the list screen or in the list when the batch action panel is active. Sorting uses a 'drag & drop' mechanism. To move a specific image in the report, long-press it. Once the element detaches from the list, you can drag it to a new position. After these actions, the photos in the report will be arranged in the order you specified.

Adding Photos from the Device Gallery

Image 1
Photos from the gallery can be added to the photo report using the button on the document's main screen. It is located next to the camera capture button. Please note that for photos added from the device gallery, authenticity verification via capture context cannot be performed.

Structuring the Photo Report

The structure of the photo report is determined by its settings. These settings can be defined when creating the photo report and modified after creation in the mobile app or on the website in the web version. When using the INSPECTOR mobile app, photos from the gallery or camera are added to the report sequentially. Note: The number of rows and columns is the same for all pages of the photo report. If you need fine-tuning of the photo report's appearance – such as margins, fonts, cell borders, text orientation, or different structures on different pages – you must use the web version of the photo-reports.online service.

Working Offline

INSPECTOR supports inspections without an internet connection. This section explains the principle of the offline mode, data storage on the device, and subsequent synchronization with the server.

How Offline Mode Works

Image 1
The structure of the app's local database mirrors the server's database structure. This allows the mobile app to operate in two modes: instant synchronization and deferred synchronization. Instant synchronization mode is the primary operating mode of the app – it is available when there is a good GSM or Wi-Fi signal. If the GSM or Wi-Fi signal quality is insufficient for stable app operation, deferred synchronization mode is activated. In this mode, the app functions autonomously and does not send data to the server. If there is a possibility that the device will be in an area with significantly varying GSM or Wi-Fi signal during an inspection, it is recommended to activate deferred synchronization mode in the user profile before starting the inspection.

Data Storage on the Device

Image 1
Image 2
In deferred synchronization mode, each unsynchronized image is marked with an exclamation mark on a red background in the top-right corner. Each unsynchronized document is also marked – the number of unsynchronized documents is displayed on a red background in the bottom-right corner of the document icon. The database of the INSPECTOR mobile app can store up to 2 GB of service data. The volume of locally stored photos is practically limited only by the device's available storage. However, the developer does not recommend storing a large number of shots and records without server synchronization for an extended period. This is because different Android devices may have different policies for storing cached app data: while one manufacturer may allow unlimited storage of app data in the cache, another may retain it only until the device is restarted or its OS is updated.

Synchronization After Connection is Restored

To send data to the server when a stable GPS or Wi-Fi signal is available, use the data synchronization mechanism. The data synchronization button appears on the app's main screen and on the document's main screen when unsynchronized data exists on the device.

Synchronization with Your Account and Working via the Website

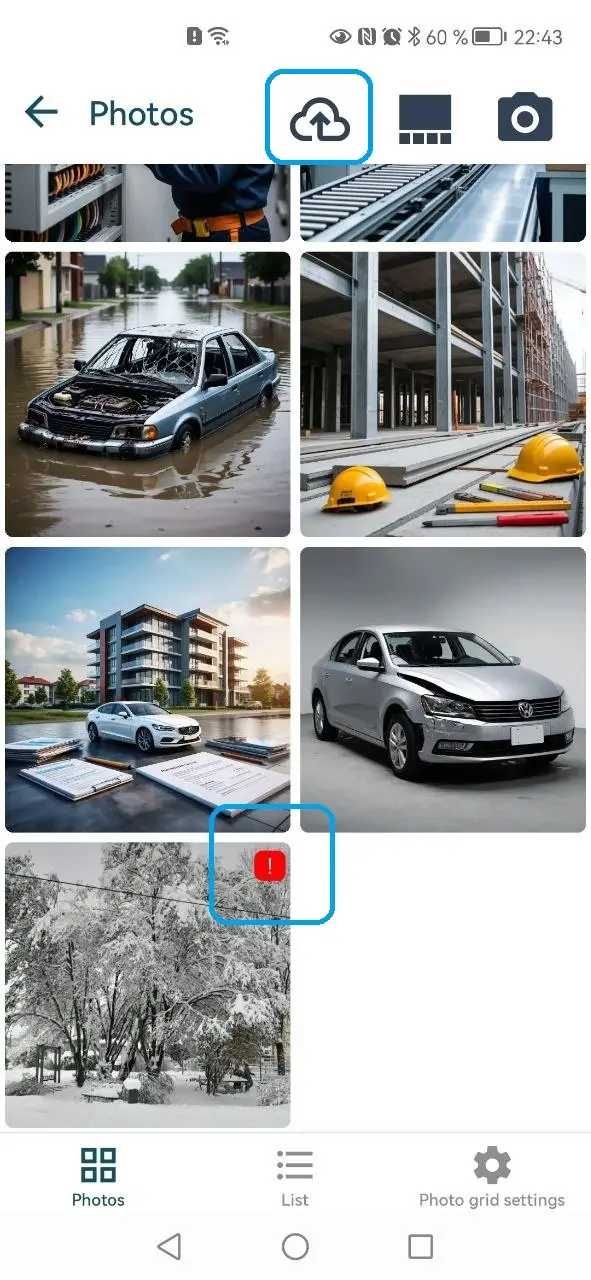
All photo reports created with the INSPECTOR mobile app are automatically available in your personal account on the Photo-reports.online website after synchronization. Users can continue working on the report via a browser, using the advanced features of the web version.

Working with a Photo Report via Your Account

The INSPECTOR mobile app is a convenient tool for creating standard photo reports in the field. Its functions are sufficient for creating large photo reports. However, the full potential of the photo report service is realized when integrating the mobile app with its web version on the photo-reports.online website. Although in 90% of cases, using the mobile app is sufficient to create a high-quality photo report, sometimes fine-tuning may be required. The web version of the service provides additional functions that allow the creation of a fully-fledged photo report with more detailed settings. For more information on using photo report settings on the website, refer to the documentation for the photo-reports.online service.

Sending Reports

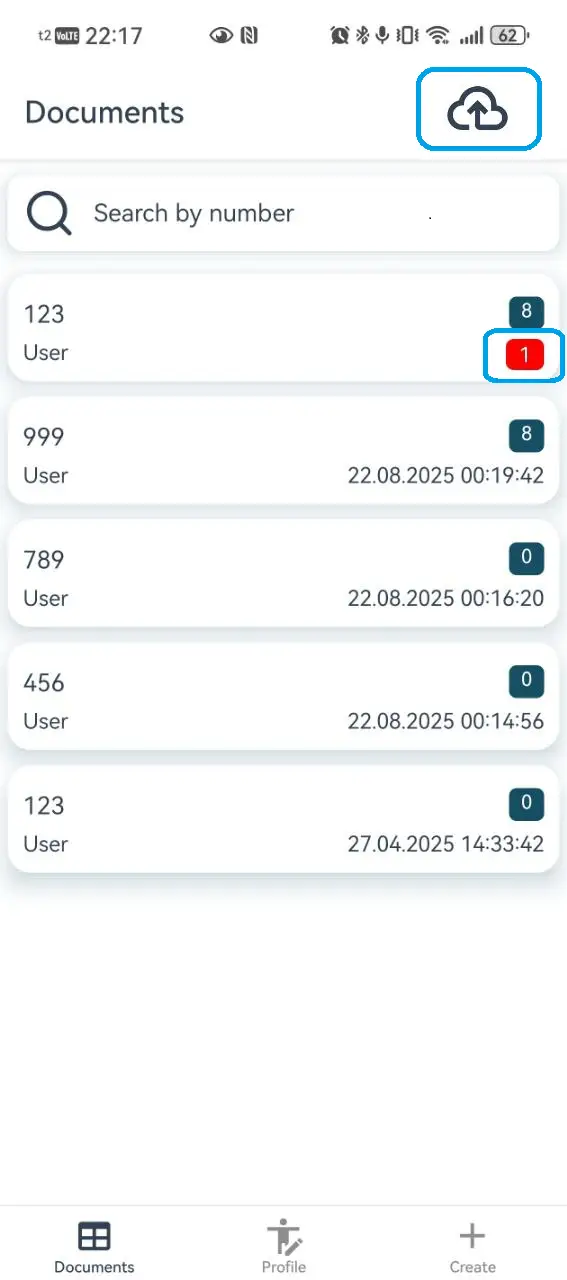
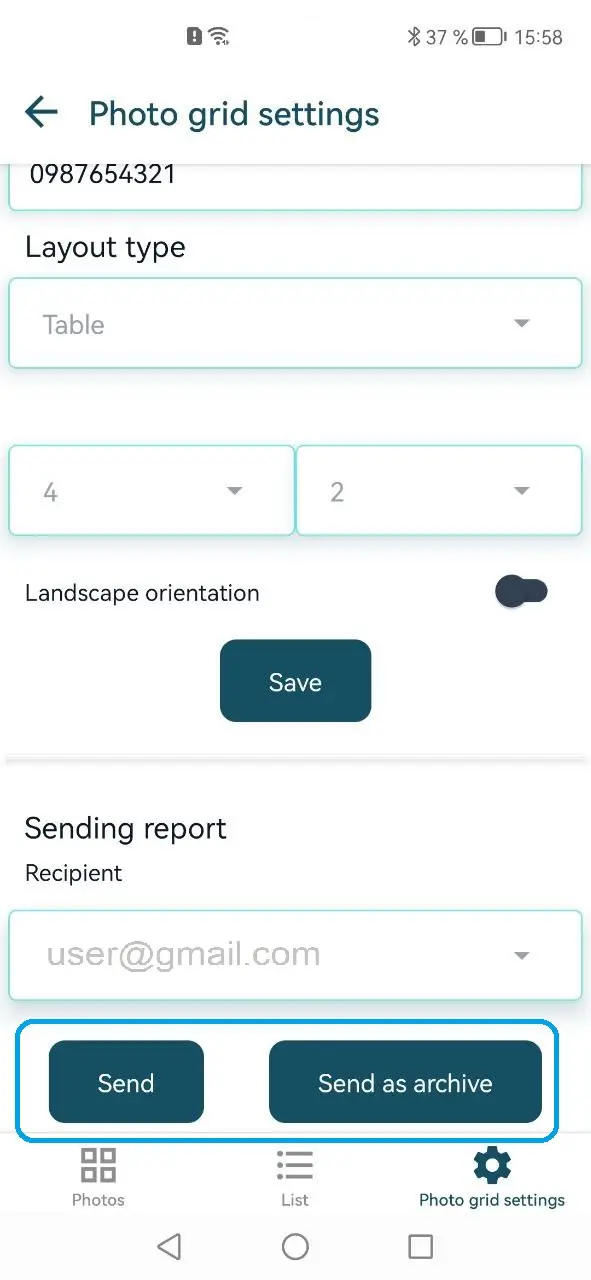
After completing an inspection, the photo report can be sent to the user's email for processing and storage. This section describes the report sending process and the statuses displayed in the app.

Sending a Photo Report by Email

Image 1
After adding photos to the photo report, the user can send it to the email address used for registration in the mobile app. The photo report file is generated in .docx format, allowing further edits after receipt.

Sending the Photo Report as Photos and Capture Context Data

The INSPECTOR mobile app allows sending capture context data along with the photos taken by the user. More information about capture context can be found on the page Photo Authenticity Verification. To send an archive with inspection photos, tap the archive send button in the photo report settings. An email with an archive should then be sent to the user's address, containing lists of photos broken down by photo report pages, indicating numbers, user-entered image descriptions, and capture context (if the photo was taken in the app with context recording).

Common Errors and Solutions

This section covers common issues that may arise when using the INSPECTOR mobile app, along with their solutions and recommendations for correct device setup. Although the developer receives feedback on most errors through analytics services, user participation in testing the app (especially when new features are introduced) helps fix bugs and issues as quickly as possible. The user profile includes a form for reporting errors or suggesting improvements. If you wish to share such information, the developer will gratefully receive it and strive to respond to your request as soon as possible.

App freezes and becomes unresponsive

This situation can have various causes. If the app freezes at some stage, simply swipe it away from the list of active apps and restart it. If this happens again, report the actions that led to the issue to the developer via the feedback form in the user profile.

Local data no longer needed

If locally stored data created without an internet connection is no longer needed, go to the user profile and tap the button at the bottom of the screen to delete local data.

Local data cannot be deleted

Occasionally, local data may be saved with errors, especially in conditions of weak or unstable GPS or Wi-Fi signals. In such cases, it may not delete on the first attempt. If this happens, enable instant synchronization mode in a stable network environment, restart the app, and try deleting the data again.

Photos in the report are arranged unattractively/unevenly

This common issue may be caused by an incorrect orientation of the mobile phone during capture. Try to choose the aspect ratio so that photos in the report look uniform. For example, for a photo report in portrait orientation with 2 columns and 4 rows, horizontal phone orientation during capture is optimal, while for 2 columns and 2 rows, vertical orientation is better. The photo report page is filled with photos optimally only when the aspect ratio and phone orientation are chosen correctly. If some shots cannot be taken in a consistent orientation, the batch image rotation tool can be used before sending or downloading the report.

Photo report not sending

This situation may have several causes: 1. Emails are going to spam – check your email's spam folder. 2. Report sending is limited for the user – go to your personal account on photo-reports.online and top up your balance. 3. Local data has not been deleted – synchronize the document with the server or delete unnecessary local data.

Permissions for camera, location, media library, or microphone are missing.

For full functionality of the mobile app, permissions must be granted for the app to access certain phone functions and tools. Without these permissions, the inspection app's operation will be limited or even impossible.
  • Camera is one of the main tools of the app; without camera access, not only is photo capture impossible, but also scanning QR codes for API tokens.
  • Location is used to determine the device's location at the time of capture; without this permission, the functions to overlay GPS coordinates on photos and save coordinates on the server cannot be used.
  • Gallery/Media Library – access is required to save reference shots there during capture.
  • Microphone can be used for voice input of photo descriptions.
To avoid interrupting the user with permission requests during each shot, a screen for granting all permissions is shown when the app starts. If you did not grant some permissions when first launching the app, go to your phone's settings -> Apps -> INSPECTOR -> Permissions and enable the required permissions.

Coordinates are not added to photos

This problem may occur in the absence of a stable GSM or Wi-Fi signal. Adding coordinates to photos in the app is based on GNSS data (Global Navigation Satellite System) transmitted via GSM and Wi-Fi networks. Therefore, a stable cellular or Wi-Fi signal is required for reliable determination of coordinates and other capture context elements.