ফটো রিপোর্ট এবং ফটো টেবিল সম্পর্কে প্রায়শই জিজ্ঞাসিত প্রশ্ন
পেশাদার ফটো রিপোর্ট, ফটো টেবিল এবং নির্মাণ ও পরিদর্শনের জন্য চাক্ষুষ ডকুমেন্টেশন তৈরির সম্পর্কে সর্বাধিক জিজ্ঞাসিত প্রশ্নের উত্তর। সেরা অনুশীলন জানুন।
ফটো রিপোর্ট এবং ফটো টেবিল সম্পর্কে সর্বাধিক সাধারণ প্রশ্নাবলী
ফটো রিপোর্ট, ফটো ডকুমেন্টেশন এবং ফটো টেবিল বলতে কি বুঝায়?
ফটো রিপোর্ট হল একটি নথি যা কোনো ঘটনা বা প্রক্রিয়ার দৃশ্য প্রমাণ সরবরাহ করে – যেমন দুর্ঘটনার স্থান, কাজ শুরু ও শেষের অবস্থা, ক্ষয়ক্ষতির চিহ্ন, নির্মাণ স্থলের পরিবেশ, কাঠামো সংযোজন ইত্যাদি। ফটো ডকুমেন্টেশনে ছবিগুলো সুসংগঠিতভাবে সাজানো থাকে, প্রতিটি ছবি সংখ্যাযুক্ত এবং সাধারণত ব্যাখ্যামূলক ক্যাপশনযুক্ত থাকে। ছবির উপর নির্দেশক চিহ্ন যেমন তীর, হাইলাইট করা আকার, বা ব্যাখ্যামূলক লেবেল যুক্ত করা যেতে পারে।
এই ফটো রিপোর্ট দেওয়ানি বা ফৌজদারি মামলায় প্রমাণ হিসেবে গৃহীত হয়, পাশাপাশি বিশেষজ্ঞের রিপোর্টের সংযুক্তি বা এর অবিচ্ছেদ্য অংশ হতে পারে, বিশেষ করে নির্মাণ তদারকি, বীমা দাবি, বা ঠিকাদারি কাজের নথিভুক্তিকরণে।
এই ফটো রিপোর্ট দেওয়ানি বা ফৌজদারি মামলায় প্রমাণ হিসেবে গৃহীত হয়, পাশাপাশি বিশেষজ্ঞের রিপোর্টের সংযুক্তি বা এর অবিচ্ছেদ্য অংশ হতে পারে, বিশেষ করে নির্মাণ তদারকি, বীমা দাবি, বা ঠিকাদারি কাজের নথিভুক্তিকরণে।
ফটো রিপোর্ট অনলাইনে কিভাবে তৈরি করবেন?
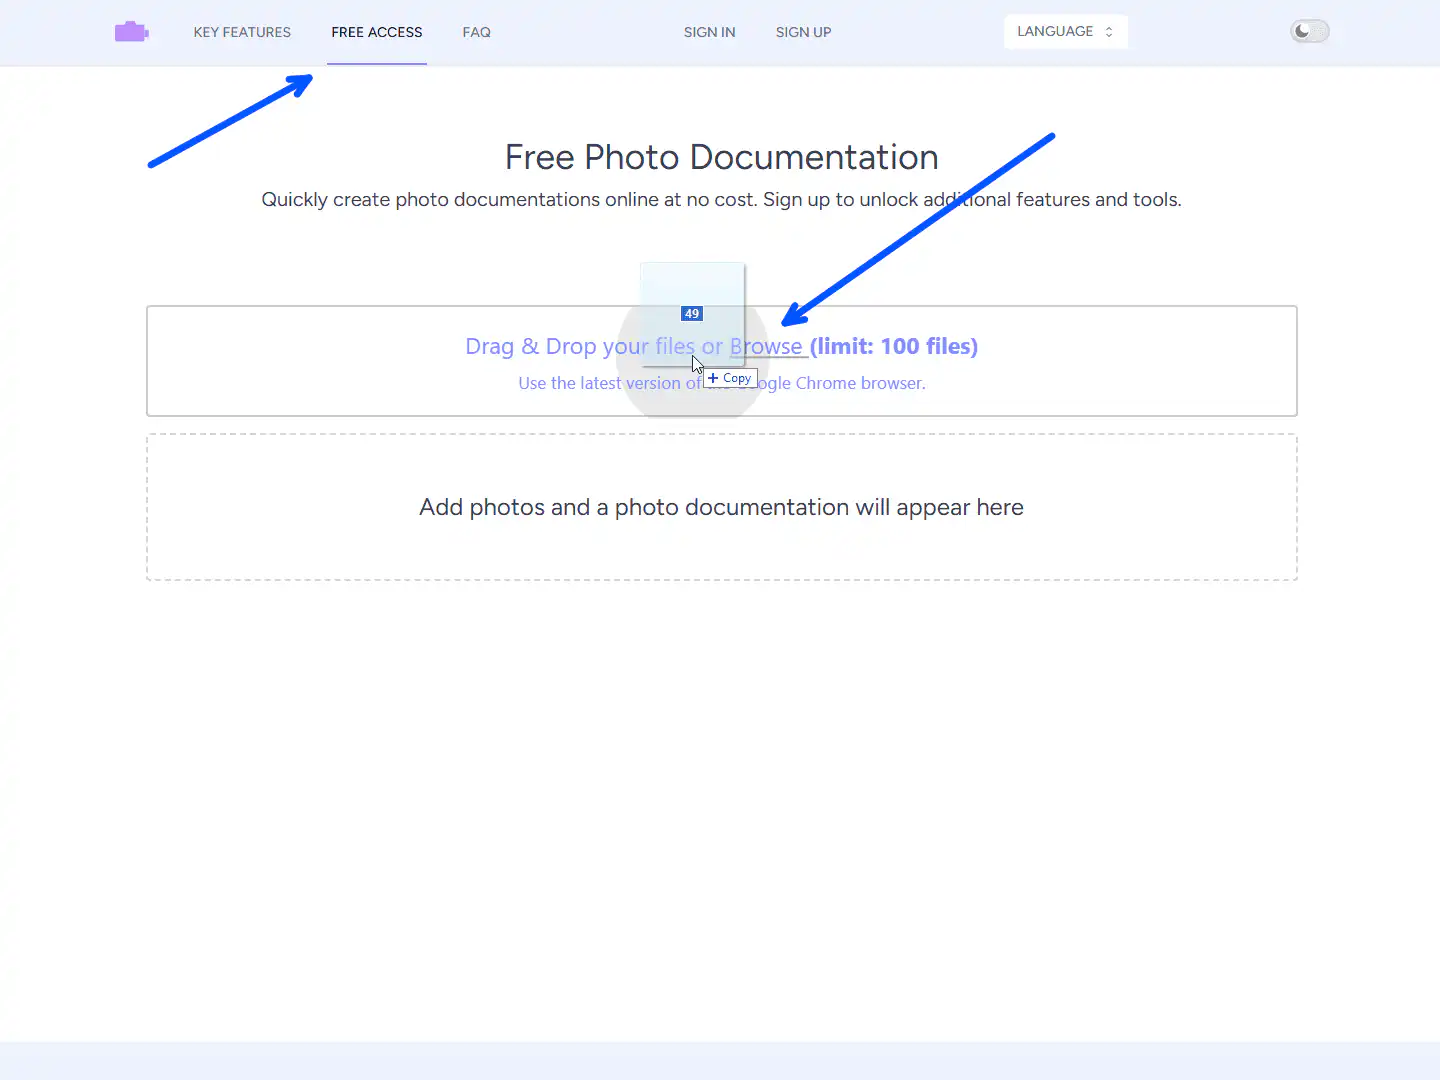
Photo-reports.online সার্ভিসে ছবি আপলোড করেই সহজে ফটো রিপোর্ট তৈরি করা সম্ভব। ছবি আপলোড করলে তা স্বয়ংক্রিয়ভাবে ২ কলাম ও ৪ সারির টেবিলে সাজানো হবে। এরপর 'ডাউনলোড' বাটনে ক্লিক করে .docx ফাইল সংগ্রহ করুন, যা Microsoft Word, LibreOffice Writer, Google Docs সহ বিভিন্ন ওয়ার্ড প্রসেসরে খোলা যাবে। পুরো প্রক্রিয়াটি ওয়েব ব্রাউজারে সম্পন্ন হয়, কোনো সফটওয়্যার ইনস্টলের প্রয়োজন নেই।
ফটো রিপোর্ট বা ফটো টেবিলে ছবির নিচে কিভাবে ক্যাপশন লিখবেন?
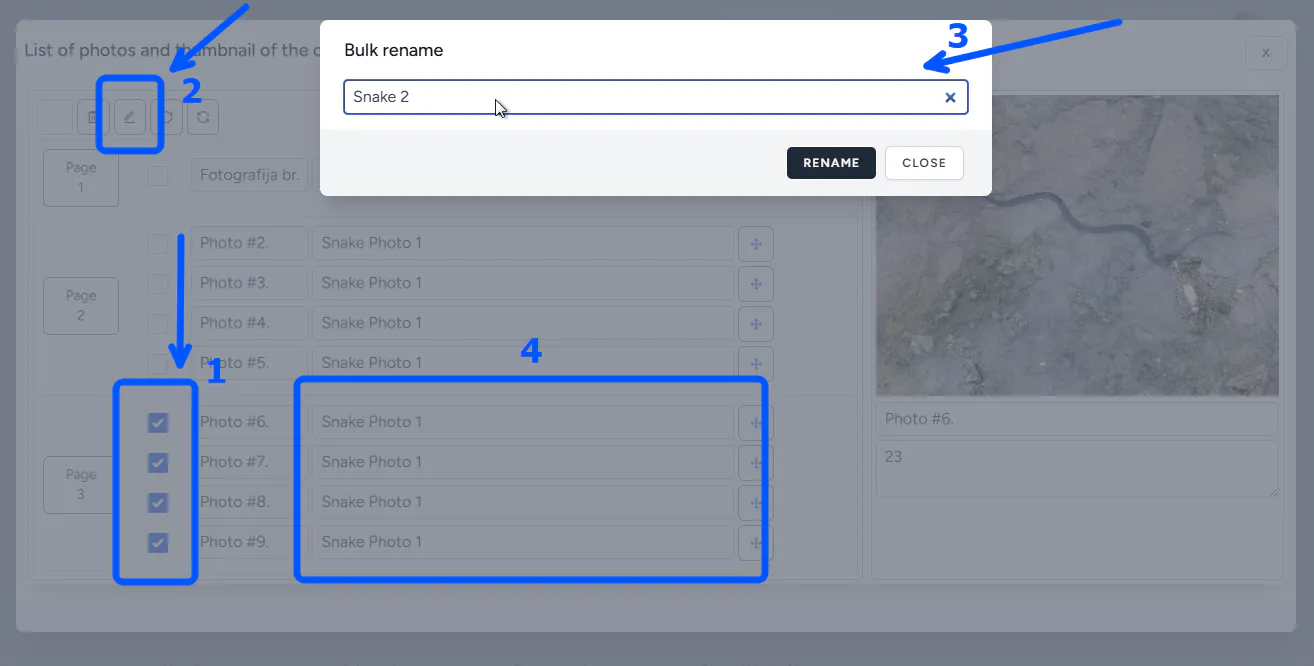
ছবির নিচে ক্যাপশন বা বিবৃতি যোগ করার তিনটি পদ্ধতি রয়েছে:
- পৃথকভাবে: প্রতিটি ছবির জন্য আলাদাভাবে কীবোর্ড দিয়ে লিখুন।
- গণ ক্যাপশন: একবার একটি ক্যাপশন লিখে নির্বাচিত সকল ছবিতে প্রয়োগ করুন।
- টেমপ্লেট ক্যাপশন: নিবন্ধিত ব্যবহারকারীরা সিস্টেমে তাদের পছন্দের স্ট্যান্ডার্ড ক্যাপশন সংরক্ষণ করতে পারেন এবং প্রয়োজন时 তা তালিকা থেকে বেছে নিতে পারেন।
ফটো রিপোর্টের টেমপ্লেট কিভাবে ব্যবহার করবেন?

সবচেয়ে সহজ পদ্ধতি হলো Photo-reports.online সার্ভিসের ডিফল্ট টেমপ্লেট ব্যবহার করা। সার্ভিসে মোট ৫টি আলাদা টেমপ্লেট পাওয়া যায়, যা ব্যবহারকারীদের ৯৫% চাহিদা পূরণ করে:
- প্রধান টেবিল টেমপ্লেট: ডিফল্টভাবে ২ কলাম ও ৪ সারির টেবিল আকারে ফটো রিপোর্ট তৈরি করে।
- বামে ছবি, ডানে ক্যাপশন: ছবি পৃষ্ঠার বাম পাশে এবং ক্যাপশন ডান পাশে থাকে। সর্বোচ্চ ৮টি ছবি যুক্ত করা যায় এবং ছবি ও ক্যাপশনের প্রস্থ শতাংশে পরিবর্তন করা যায়।
- ডানে ছবি, বামে ক্যাপশন: দ্বিতীয় টেমপ্লেটের বিপরীত বিন্যাস, অনুরূপ সেটিংস সহ।
- উপরে ছবি, নিচে ক্যাপশন: ছবি পৃষ্ঠার উপরের দিকে এবং ক্যাপশন নিচে থাকে। ছবি ও ক্যাপশনের উচ্চতার অনুপাত নিয়ন্ত্রণ করা যায়।
- নিচে ছবি, উপরে ক্যাপশন: চতুর্থ টেমপ্লেটের বিপরীত বিন্যাস।
কাজের প্রক্রিয়া 'আগে' এবং 'পরে' ফটো রিপোর্ট, ফটো ডকুমেন্টেশন এবং ফটো টেবিল
'আগে/পরে' ফটো রিপোর্টের জন্য কোন ফরম্যাটটি সঠিক বলে বিবেচিত হয়?
একটি পেশাদার 'আগে/পরে' ফটো রিপোর্টের জন্য নিম্নলিখিত বৈশিষ্ট্য থাকা আবশ্যক:
• একই ক্যামেরা কোণ এবং দূরত্ব বজায় রাখা
• ছবিগুলোর ক্রমিক এবং যৌক্তিক ক্রম
• প্রতিটি ছবির জন্য স্পষ্ট তারিখ এবং সময় স্ট্যাম্প
• প্রতিটি পর্যায়ের সংক্ষিপ্ত কিন্তু তথ্যপূর্ণ বিবরণ
• সমগ্র রিপোর্টে সামঞ্জস্যপূর্ণ লেআউট এবং ফরম্যাটিং
• প্রয়োজনীয় হলে জিপিএস স্থানাঙ্ক বা অবস্থান তথ্য
এই কাঠামোটি নিশ্চিত করে যে রিপোর্টটি বোধগম্য, বিশ্বাসযোগ্য এবং প্রয়োজনে আইনি বা প্রযুক্তিগত পর্যালোচনায় ব্যবহৃত হতে পারে।
'আগে ও পরে' ফটো রিপোর্টের জন্য কতগুলি ছবি প্রয়োজন?
ছবির সংখ্যা প্রকল্পের জটিলতা এবং সুস্পষ্ট প্রমাণের প্রয়োজনীয়তার উপর নির্ভর করে। সাধারণ নির্দেশিকা:
• প্রতিটি মূল পর্যায়ের জন্য কমপক্ষে ২টি ছবি (আগে ও পরে)
• সামগ্রিক দৃশ্যের জন্য ১-২টি ছবি
• নির্দিষ্ট বিবরণ বা ত্রুটির জন্য ক্লোজ-আপ ছবি
• সংযোগ বা রূপান্তর বিন্দুগুলির ছবি
সাধারণত, একটি ছোট প্রকল্পের জন্য ১০-১৫টি ছবি যথেষ্ট, যখন বড় প্রকল্পে ৩০-৫০টি বা তার বেশি ছবি প্রয়োজন হতে পারে। মূল নীতি হল: প্রতিটি উল্লেখযোগ্য পরিবর্তন বা অবস্থা দৃশ্যত প্রমাণিত হওয়া উচিত।
হস্তান্তর বা বিরোধের জন্য 'আগে/পরে' ফটো রিপোর্ট ব্যবহার করা যাবে কি?
হ্যাঁ, একটি সুসংগঠিত 'আগে/পরে' ফটো রিপোর্ট হস্তান্তর প্রক্রিয়া, গুণমান নিয়ন্ত্রণ এবং সম্ভাব্য বিরোধে মূল্যবান প্রমাণ সরবরাহ করতে পারে। এটি:
• কাজের পরিধি এবং সম্পূর্ণতা নথিভুক্ত করে
• গুণমানের মান এবং চুক্তি শর্তাদি যাচাই করে
• সময়ের সাথে পরিবর্তন এবং অগ্রগতি রেকর্ড করে
• উভয় পক্ষের জন্য স্বচ্ছতা এবং জবাবদিহিতা নিশ্চিত করে
আইনি প্রেক্ষাপটে, এই রিপোর্টগুলি সহায়ক প্রমাণ হিসেবে কাজ করতে পারে, বিশেষ করে যখন তারা ক্রমিক তারিখ, সময়, এবং প্রাসঙ্গিক বিবরণ সহ উপস্থাপিত হয়।
সম্পন্ন কাজের 'আগে ও পরে' ফটো রিপোর্ট কিভাবে তৈরি করবেন?
একটি কার্যকর 'আগে ও পরে' ফটো রিপোর্ট তৈরি করতে নিচের ধাপগুলি অনুসরণ করুন:
1. কাজ শুরু করার আগে বা হস্তান্তরের সময় অবজেক্টের ছবি তুলুন।
2. অগ্রগতি দেখাতে মূল পর্যায়গুলি ধারাবাহিকভাবে রেকর্ড করুন।
3. কাজ শেষ হওয়ার পর একই কোণ এবং দূরত্ব থেকে ছবি তুলুন।
4. Photo-reports.online-এ ড্র্যাগ অ্যান্ড ড্রপ ব্যবহার করে ছবিগুলো কাঙ্ক্ষিত ক্রমে সাজান।
5. মূল পর্যায়গুলি গণ ক্যাপশন বা সংরক্ষিত টেমপ্লেট দিয়ে লেবেল করুন।
6. প্রথম বা শেষ পৃষ্ঠায় সর্বাধিক প্রতিনিধিত্বমূলক 'আগে' এর ছবি রাখুন।
7. প্রয়োজনে অন্তর্নির্মিত সম্পাদকে পাঠ্য বা গ্রাফিক্স যুক্ত করুন।
পরিদর্শন মোবাইল অ্যাপ্লিকেশন সম্পর্কে প্রায়শই জিজ্ঞাসিত প্রশ্ন
অ্যাপ্লিকেশন কি ইন্টারনেট ছাড়া কাজ করে?
হ্যাঁ, INSPECTOR মোবাইল অ্যাপ্লিকেশন দুইটি মোডে কাজ করে:
1. তাৎক্ষণিক সিঙ্ক্রোনাইজেশন: ইন্টারনেট সংযোগ থাকলে ছবি এবং ডেটা স্বয়ংক্রিয়ভাবে সার্ভারে সিঙ্ক হয়।
2. বিলম্বিত সিঙ্ক্রোনাইজেশন: ইন্টারনেট সংযোগ না থাকলে ছবি ডিভাইসে সংরক্ষিত হয় এবং প্রথম সুযোগে সার্ভারে সিঙ্ক করার জন্য প্রস্তুত থাকে। এই মোডটি ফিল্ডে কাজ করার সময় বিশেষভাবে উপযোগী, যেখানে ইন্টারনেট সংযোগ সীমিত বা অনুপস্থিত থাকতে পারে।
ফটোগ্রাফে অবস্থান এবং জিপিএস স্থানাঙ্ক কিভাবে যোগ করবেন?
INSPECTOR মোবাইল অ্যাপ্লিকেশনে জিপিএস স্থানাঙ্ক এবং অবস্থান দুইভাবে যোগ করা যায়:
1. ব্যবহারকারী প্রোফাইলে ফ্ল্যাগ সেট করে প্রতিটি ছবিতে ডিফল্টভাবে জিপিএস স্থানাঙ্ক এবং ঠিকানা যোগ করা।
2. ক্যামেরা চালু করার সময় প্রতি ইনিশিয়ালাইজেশনে জিপিএস স্থানাঙ্ক এবং ঠিকানা যোগ করার প্রয়োজনীয়তা উল্লেখ করা।
ফটোগ্রাফে তারিখ কিভাবে যুক্ত করবেন?
INSPECTOR মোবাইল অ্যাপ্লিকেশনে তারিখ এবং সময় সহজেই যুক্ত করা যায়। দুটি উপায় আছে:
1. ব্যবহারকারী প্রোফাইলে ফ্ল্যাগ সেট করে ডিফল্টভাবে প্রতিটি ফটোগ্রাফে তারিখ এবং সময় যোগ করা।
2. শুধুমাত্র প্রয়োজন হলে ক্যামেরা ইনিশিয়ালাইজ করার সময় তারিখ এবং সময় যোগ করার মেনুয়ালি চিহ্নিত করা।
ফটো প্রমাণের সত্যতা কিভাবে যাচাই করবেন?
ডিজিটাল সিস্টেমে ফটো প্রমাণের সত্যতা যাচাই করা একটি জটিল কিন্তু সমাধানযোগ্য কাজ। INSPECTOR অ্যাপ্লিকেশনে এটি শুটিংয়ের প্রসঙ্গ বিশ্লেষণের মাধ্যমে বাস্তবায়িত হয়।
যে ডেটা সত্যতা নিশ্চিত করে:
সিস্টেমটি শুটিংয়ের 'ডিজিটাল ফিঙ্গারপ্রিন্ট' তৈরি করে এমন প্যারামিটারের একটি কমপ্লেক্স রেকর্ড করে:
1. টাইমস্ট্যাম্প
- ডিভাইসে ফটো তৈরির সঠিক সময়;
- ডেটা রেকর্ড এবং আপডেটের সিস্টেম টাইমস্ট্যাম্প।
এই ডেটা দাবিকৃত এবং প্রকৃত শুটিং সময়ের মধ্যে ব্যবধান সনাক্ত করতে সাহায্য করে।
2. জিওলোকেশন ডেটা
- শুটিং স্থানের স্থানাঙ্ক;
- অবস্থান নির্ধারণের যথার্থতা।
দাবিকৃত লোকেশনের সাথে স্থানাঙ্কের মিল এবং উপযুক্ত জিপিএস যথার্থতা সত্যতার শক্তিশালী প্রমাণ হিসেবে কাজ করে।
3. সরঞ্জাম এবং সফ্টওয়্যার আইডেন্টিফায়ার
- ডিভাইসের ইউনিক আইডি;
- গ্যাজেট মডেল;
- অপারেটিং সিস্টেম;
- অ্যাপ্লিকেশন সংস্করণ।
এই ডেটা ছবি তোলা ডিভাইসের 'ডিজিটাল প্রোফাইল' তৈরি করে।
4. বাহ্যিক ডেটার সাথে সংযোগ
- ফটোর রেকর্ডের লিংক;
- ঠিকানা ডেটার সাথে লিঙ্ক (যদি স্থানাঙ্ক ঠিকানায় রূপান্তরিত হয়);
- সময় সঠিকভাবে ব্যাখ্যার জন্য টাইম জোন তথ্য।
পদ্ধতির সুবিধা:
• স্বচ্ছতা - ব্যবহারকারী স্বাধীনভাবে প্রসঙ্গ যাচাই করতে পারেন;
• ব্যাপকতা - একই সাথে সমস্ত প্যারামিটার জাল করা অত্যন্ত কঠিন;
• জাল করার অর্থনৈতিক অব্যবহার্যতা - জাল করার খরচ সম্ভাব্য সুবিধাকে ছাড়িয়ে যায়।
ফটোগ্রাফের সত্যতা যাচাই সম্পর্কে প্রায়শই জিজ্ঞাসিত প্রশ্ন
ছবি বিশ্লেষণ ছাড়াই কি ফটোগ্রাফের সত্যতা যাচাই করা যায়?
হ্যাঁ। প্রাসঙ্গিক যাচাইয়ের কাঠামোর মধ্যে ছবিকে পিক্সেলের সংগ্রহ হিসাবে নয়, বরং এটি তৈরি করার শর্ত এবং প্রক্রিয়া পরীক্ষা করা হয়: কখন, কোন প্রসঙ্গে এবং ব্যবহারকারীর কোন ক্রিয়াকলাপের সময় ছবিটি তোলা হয়েছিল।
ফটোগ্রাফ সম্পাদনা করা হয়েছে কিনা আপনি কি পরীক্ষা করেন?
না। প্রসঙ্গ দ্বারা সত্যতা যাচাই করা ছবি সম্পাদনা সনাক্ত করার জন্য নয়। এমনকি একটি সম্পাদিত ছবিও শুটিংয়ের নির্ভরযোগ্য প্রসঙ্গ থাকতে পারে যদি প্রক্রিয়াটি সঠিকভাবে নথিভুক্ত করা হয়ে থাকে।
প্রসঙ্গ যাচাই AI ছবি বিশ্লেষণ থেকে কিভাবে আলাদা?
AI বিশ্লেষণ ভিজ্যুয়াল বিষয়বস্তু এবং সম্ভাবনার সাথে কাজ করে। প্রসঙ্গ যাচাই নথিভুক্ত প্রক্রিয়া, ক্রিয়াকলাপের ক্রম এবং পুনরুৎপাদনযোগ্য ডেটার উপর নির্ভর করে, যা এটিকে ব্যাখ্যাযোগ্য এবং যাচাইযোগ্য করে তোলে।
ফটোগ্রাফ দ্বারা শুটিংয়ের স্থান প্রমাণ করা কি সম্ভব?
প্রসঙ্গ যাচাই ভৌগলিক স্থানকে তথ্য হিসাবে নিশ্চিত করার দাবি করে না। শুধুমাত্র নথিভুক্ত দৃশ্যকল্পের কাঠামোর মধ্যে শুটিংয়ের সাথে কোন শর্ত এবং ক্রিয়াকলাপ যুক্ত ছিল তা নিশ্চিত করা হয়।
এই ধরনের যাচাই কি আইনি এবং বিশেষজ্ঞ কাজের জন্য উপযুক্ত?
প্রাসঙ্গিক যাচাই বিশেষজ্ঞ প্রতিবেদনের বিকল্প নয়, তবে ফটো প্রমাণ বিশ্লেষণে স্বচ্ছ এবং পুনরুৎপাদনযোগ্য ডেটার অতিরিক্ত উৎস হিসাবে ব্যবহার করা যেতে পারে।
শুটিংয়ের প্রসঙ্গ জাল করা কি সম্ভব?
প্রাসঙ্গিক মডেলটি এমনভাবে তৈরি করা হয়েছে যাতে শুটিংয়ের শর্তগুলি পিছনের তারিখে পরিবর্তন বা পুনর্লিখন বাদ দেওয়া যায়। তবে পদ্ধতিটি সৎভাবে এর সীমাবদ্ধতা নির্দেশ করে এবং চূড়ান্ত সত্যের দাবি করে না।
কোন ক্ষেত্রগুলির জন্য প্রসঙ্গ দ্বারা সত্যতা যাচাই বিশেষভাবে উপযোগী?
এই পদ্ধতিটি পরিদর্শন, প্রযুক্তিগত পরিদর্শন, ব্যবসায়িক রিপোর্টিং, সাংবাদিকতা, গবেষণা এবং ফটোগ্রাফিক উপাদানের প্রাথমিক আইনি মূল্যায়নে প্রয়োগ করা হয়।
প্রসঙ্গ যাচাই কি প্রমাণ করে যে ঘটনাটি সত্যিই ঘটেছিল?
না, প্রসঙ্গ যাচাই এই দাবি করে না যে কোন ঘটনা ঘটেছে। এটি শুধুমাত্র নিশ্চিত করে যে একটি ফটোগ্রাফ নির্দিষ্ট পরিস্থিতিতে নেওয়া হয়েছিল (সময়, অবস্থান, ডিভাইস, ইত্যাদি), কিন্তু ছবির বিষয়বস্তুর সত্যতা নয়।
কোন পরিস্থিতিতে সত্যতা যাচাই প্রয়োজন?
সত্যতা যাচাই নিম্নলিখিত পরিস্থিতিতে বিশেষভাবে গুরুত্বপূর্ণ:
• বীমা দাবি তদন্ত এবং যাচাই
• নির্মাণ কাজের গুণমান নিয়ন্ত্রণ এবং হস্তান্তর
• চুক্তি নির্দিষ্টকরণ অনুসারে কাজের পরিধি যাচাই
• সম্ভাব্য আইনি বিরোধের জন্য প্রমাণ সংরক্ষণ
• নিয়ন্ত্রক বা কমপ্লায়েন্স পরিদর্শনের সময় তথ্য সংগ্রহ
• সরবরাহকৃত সামগ্রী বা পরিষেবার অবস্থা নথিভুক্তকরণ
এই ক্ষেত্রগুলিতে, সময়, অবস্থান এবং প্রক্রিয়া সম্পর্কিত বিশ্বাসযোগ্য এবং যাচাইযোগ্য ডেটা সংরক্ষণ করা প্রয়োজনীয়।